|
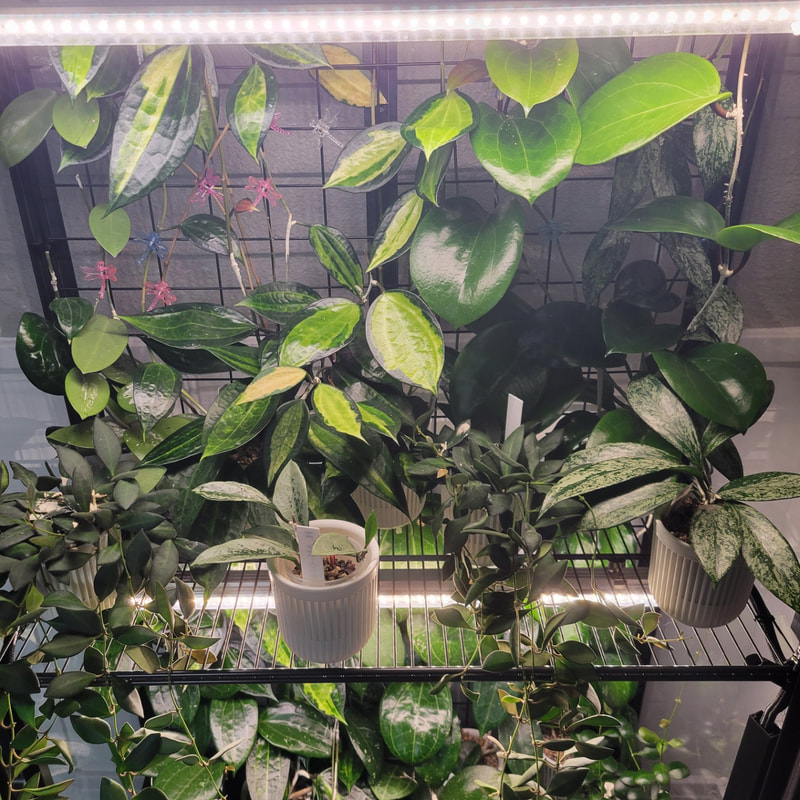
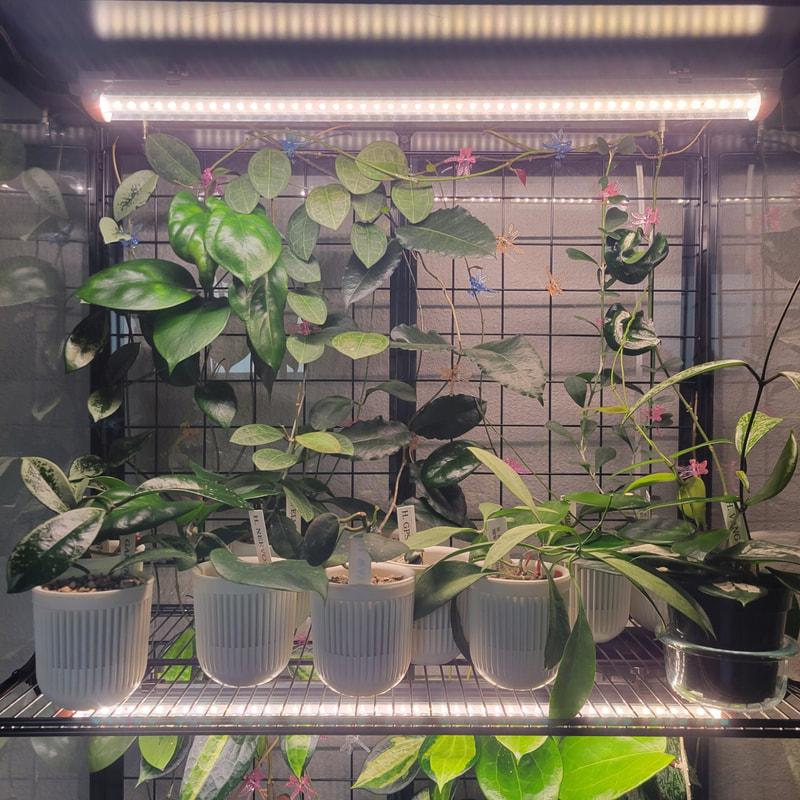
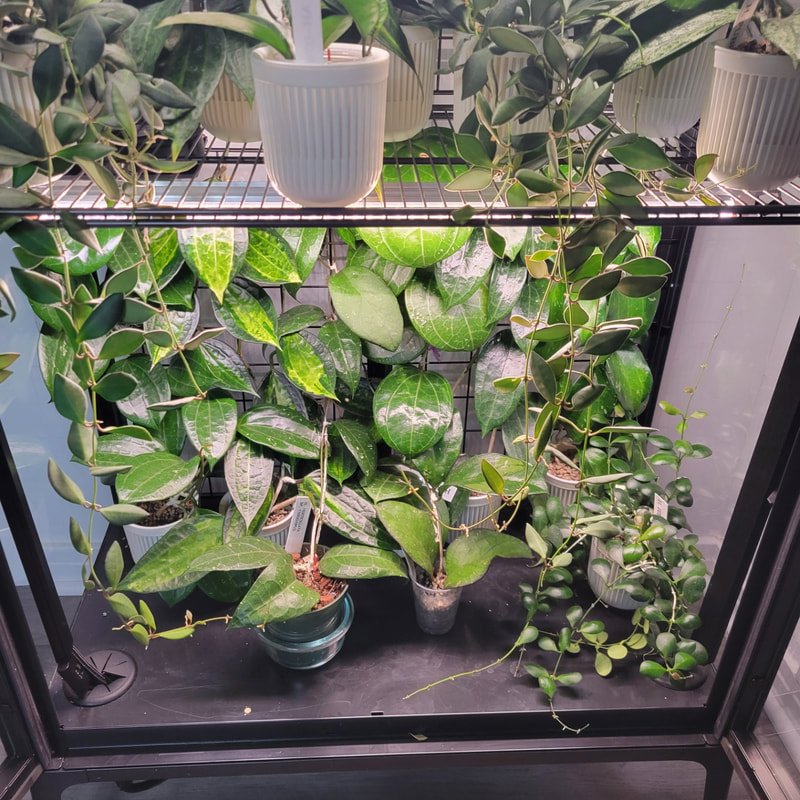
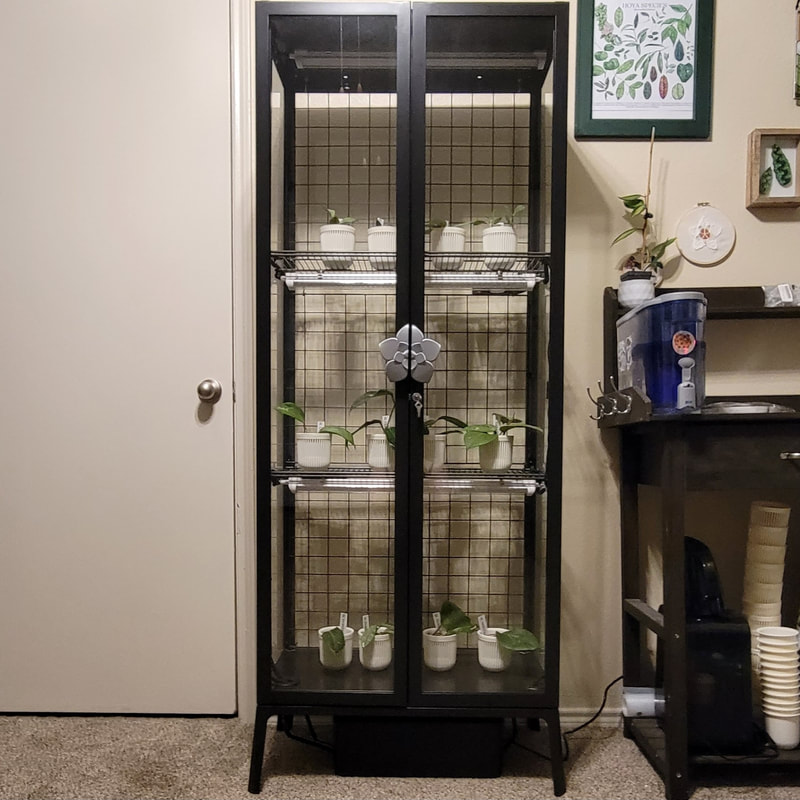
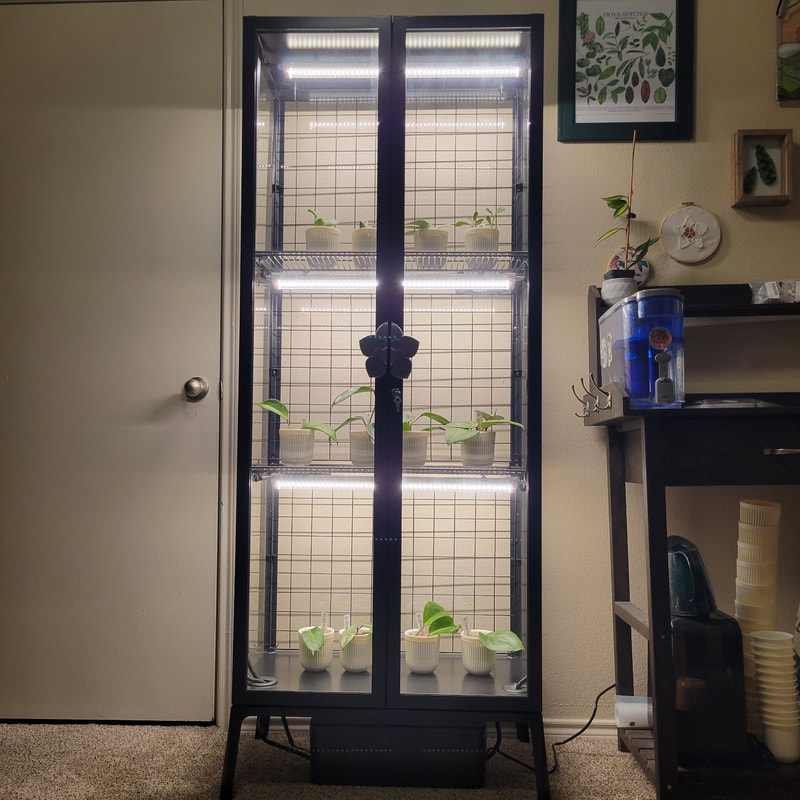
My Milsbo set up has been working great since I set everything up. The only thing I would consider doing is switching out my Barrina's for the all-black magnetic finished ones which is just a cosmetic upgrade. All my plants have been thriving in the cabinet even though I have been less rigid about fertilizing. So far, no issues with rust or anything on the cabinet itself. Some of my newer editions to the cabinet are H. Ricardo, H. vangviengensis, H. bilobata. Shout out to plant_mom for gifting me H. elliptica after mine died and H. waymanie. My condolences to the ones that did not have the grit to make it in the cabinet I am looking at you H. Patricia and H. rintzii (Borneo).
0 Comments
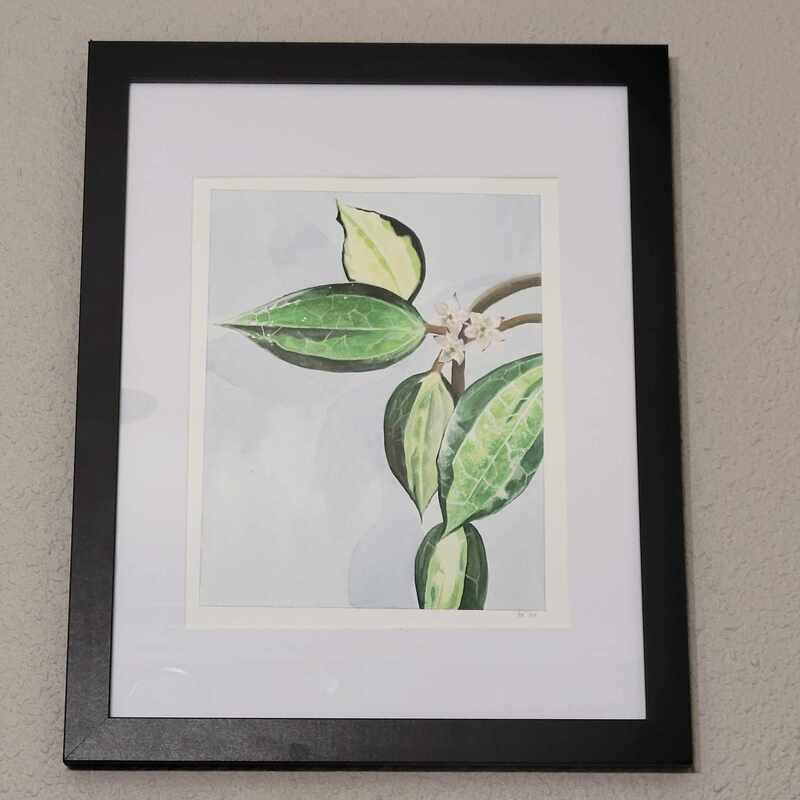
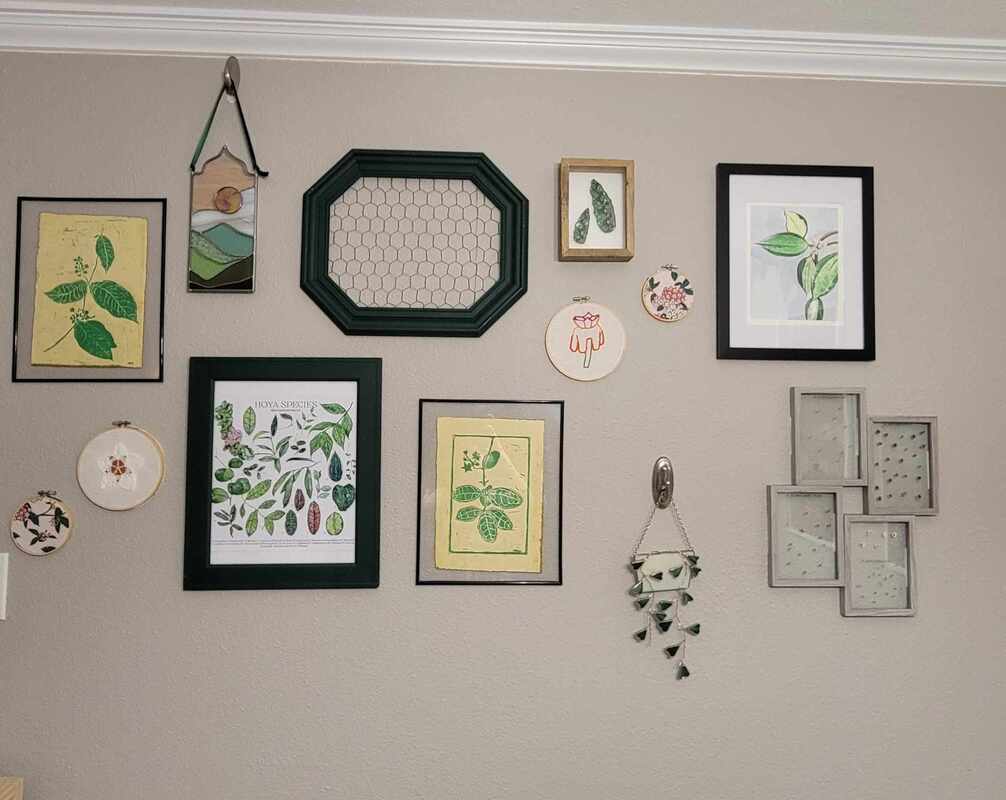 As the years have gone on in my Hoya collecting, I find that I am enjoying having a small collection and have been focusing on other aspects of plants. One of my current projects is a Hoya themed art wall. A lot of pieces I have had for years but I started collecting a couple new ones and realized that I had a hard time finding exactly what I was looking for. I wanted to share my wall and some artists I have purchased from.
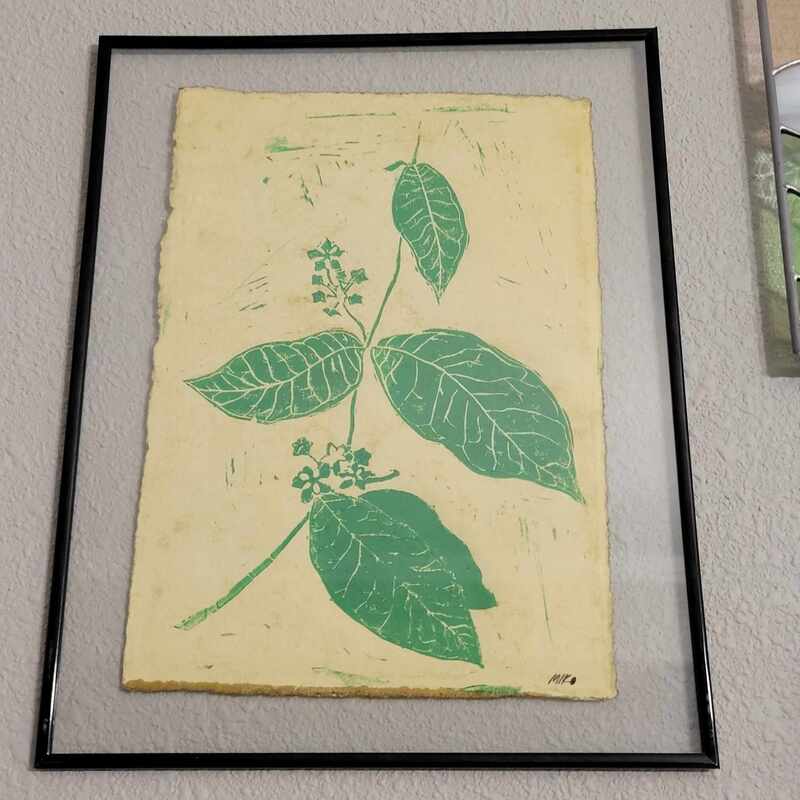
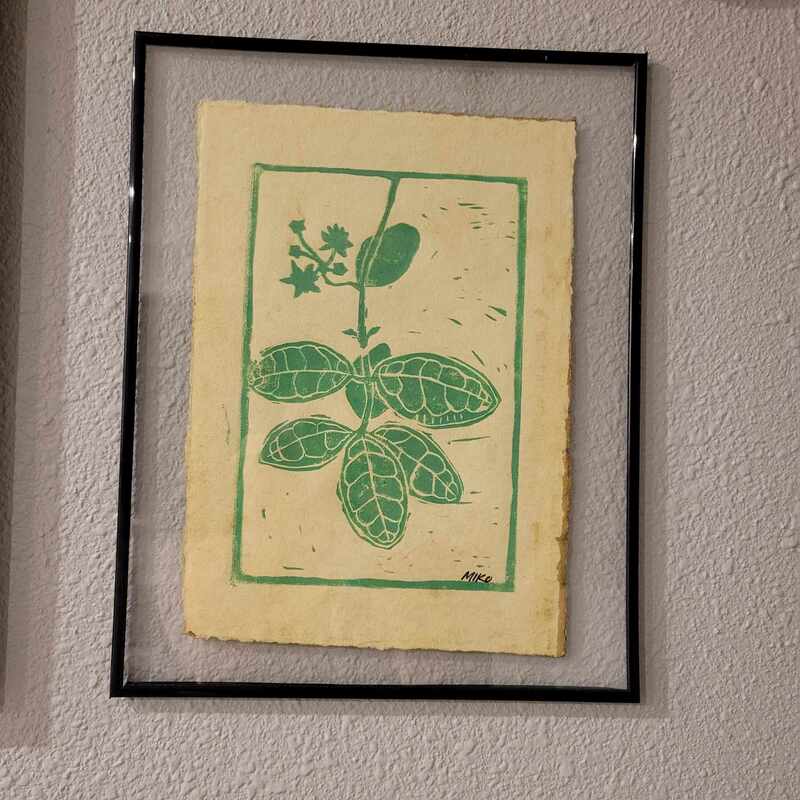
Block prints of Hoya sp. Gunung Gading and Hoya elliptica. I bought these years ago and cannot for the life of me find the artists Instagram but they are signed Miko.
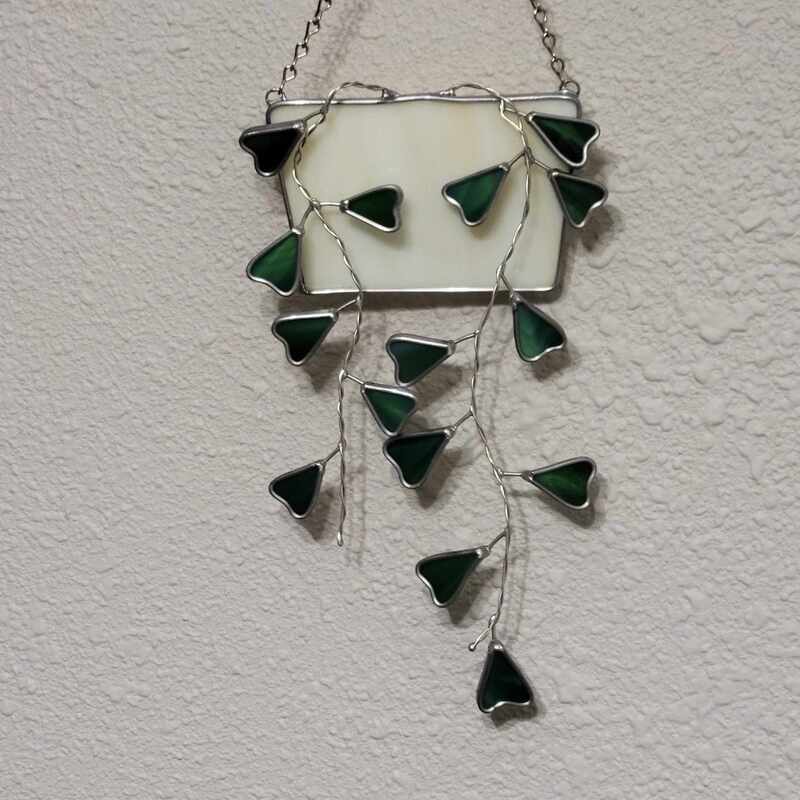
The stain glass of Hoya manipurensis in a pot was made by Cadence aka little.lam.glass on Instgram.
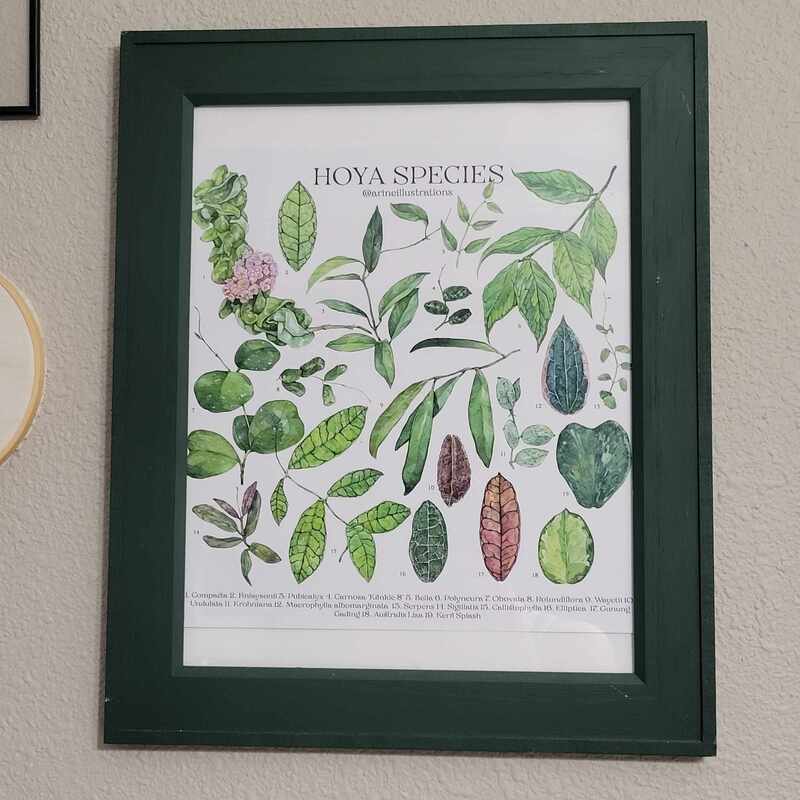
Hoya species print by arineillustrations. Arina even sells her original pieces which is really neat.
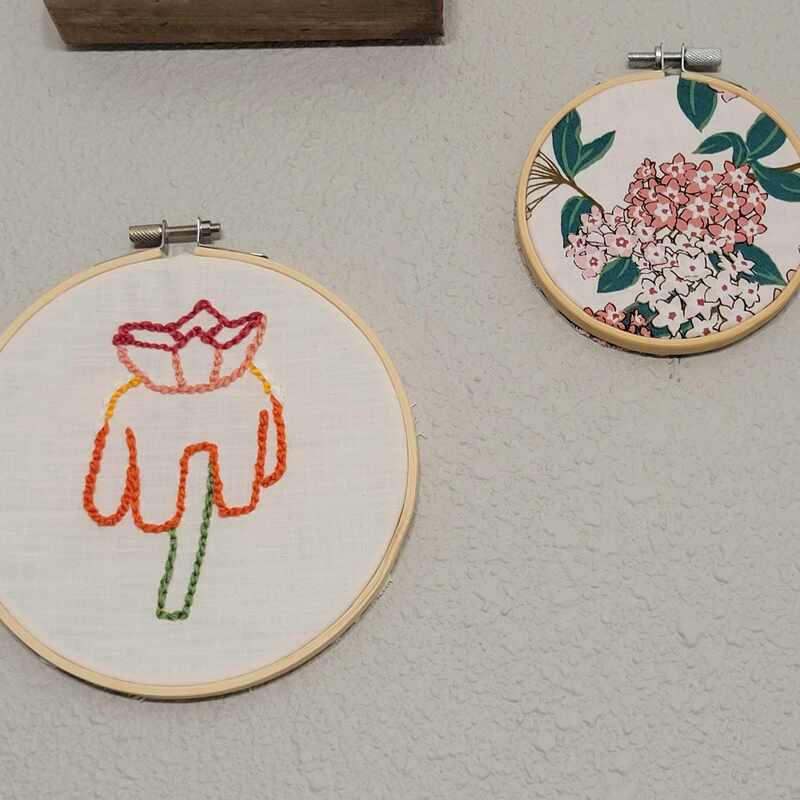
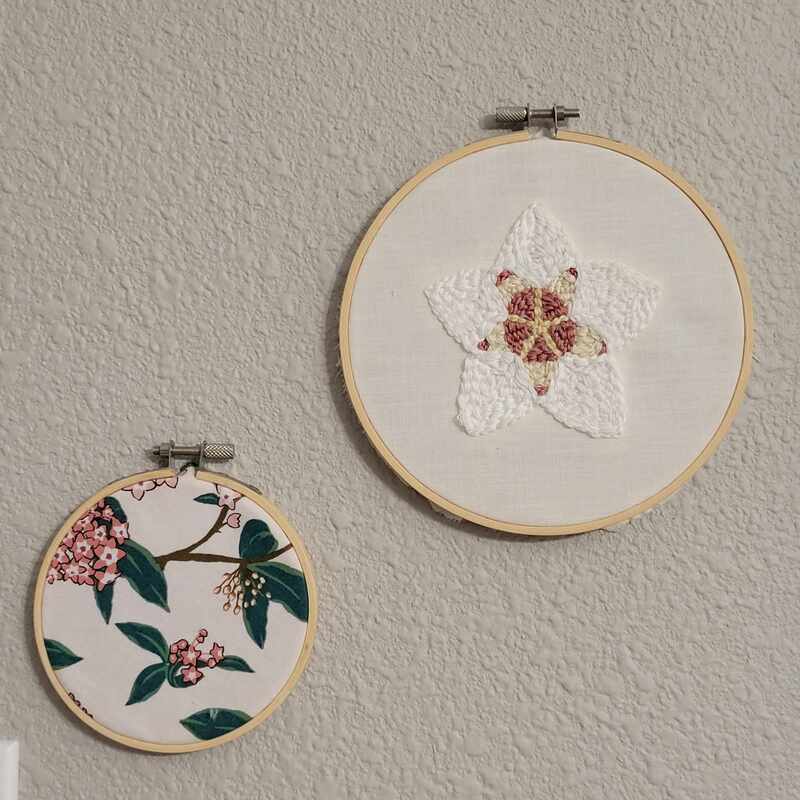
The Hoya themed fabric in the smaller embroidery hoops is from Etsy. The two larger embroidery hoops is a punch needle of a Hoya carnosa and Hoya praetorii bloom. I made both of those.
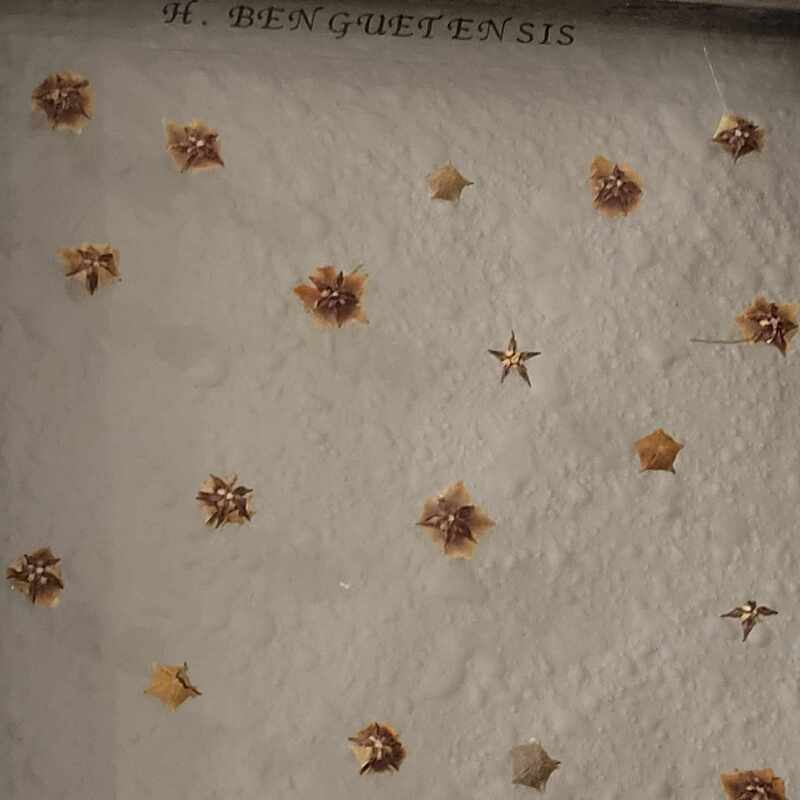
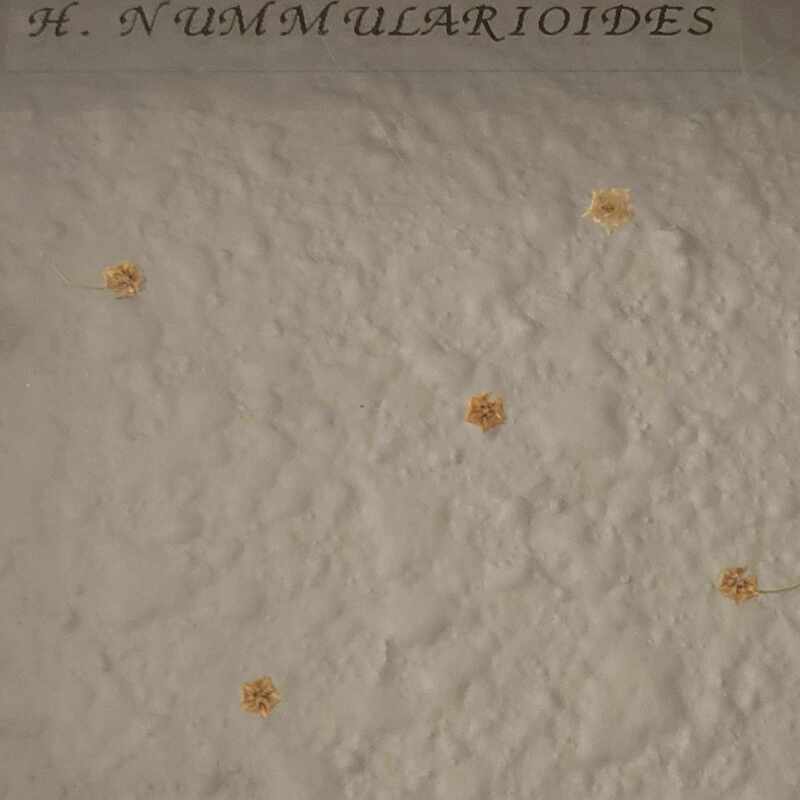
The grey set of four frames are Hoya blooms that I preserved from my own plants and then hung in frames. Hard to get a good picture of them since they are in clear frames.
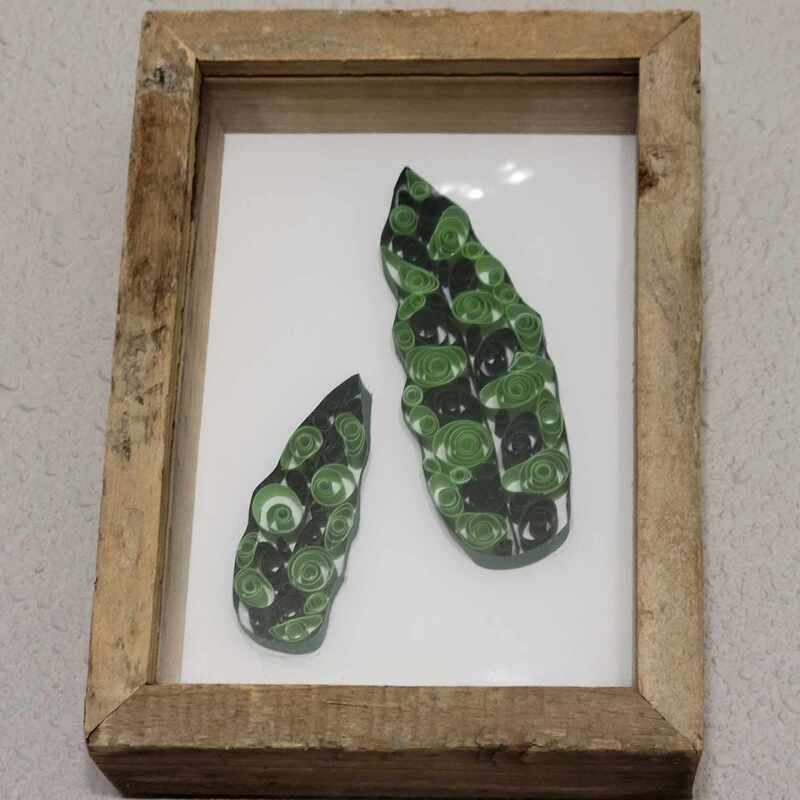
The little leaves in the light wood shadow box are made from paper curling. I had it custom made from someone on Facebook a few years ago. Non-Hoya Related:
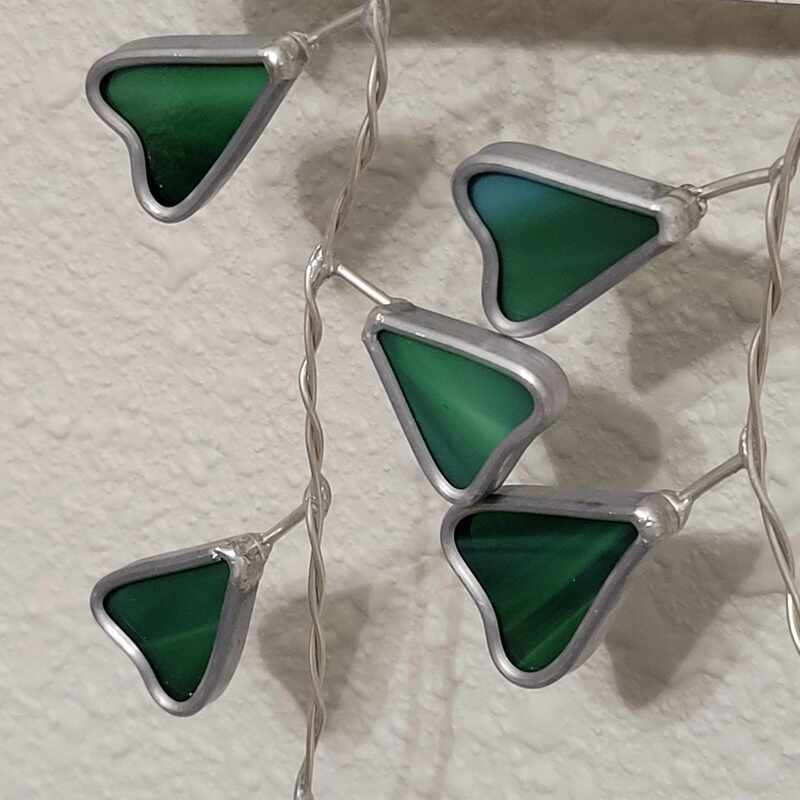
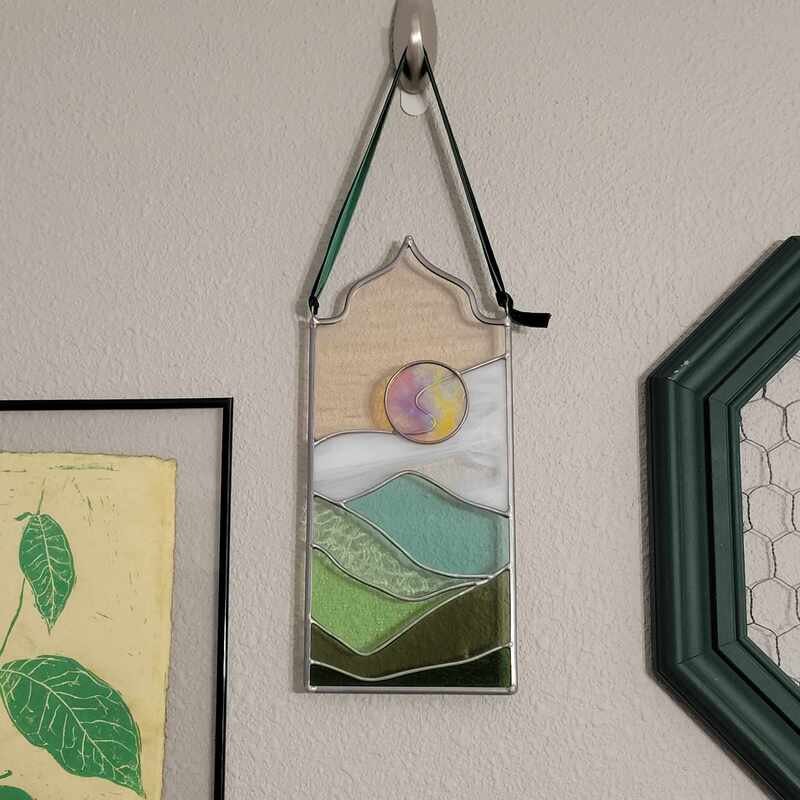
Stain glass of nature by Cellar Door Trades. They make one of a kind pieces and do various drops.
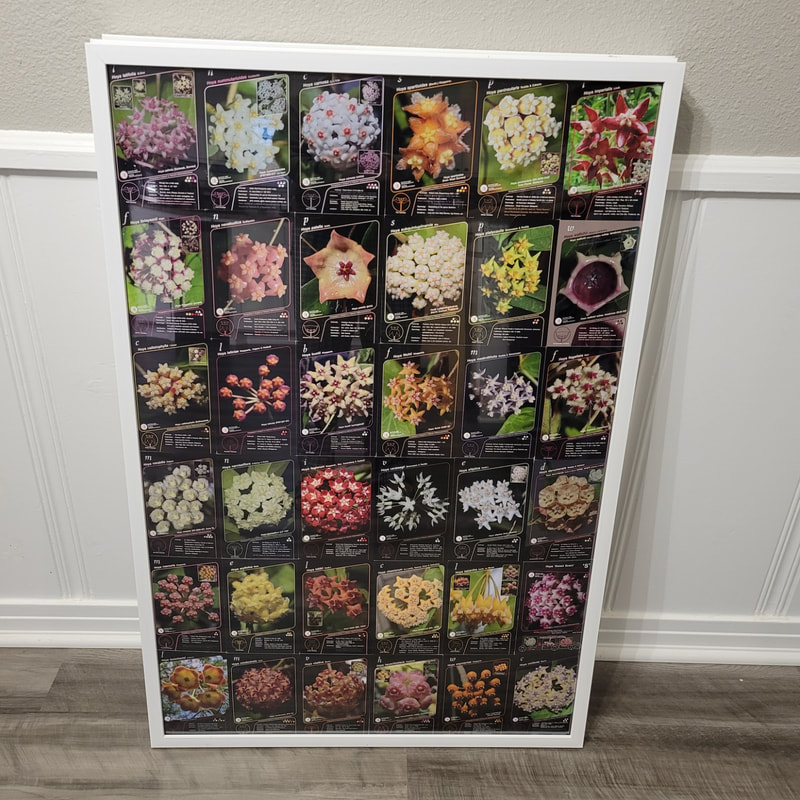
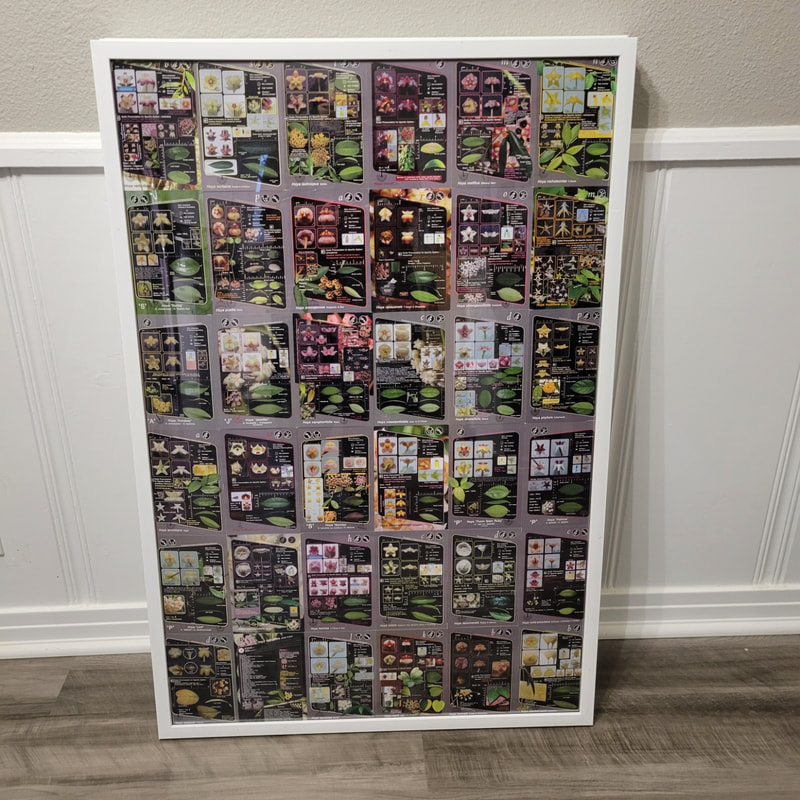
For years my Hoya cards from A Hoya Study Corner by SC Plants has been sitting in my potting bench collecting dust. I never could find a great way to display them since they are two sided. Recently, I decided I needed to find a way to display these even if I could not see both sides. Originally, I thought about getting a collage frame since the cards are 4x6in but that was very expensive. I settled on these 24in x 36in poster frames. I bought a total of 3 frames. I was able to fit 36 cards per frame. They are held in place by museum putty. Every corner of the cards has a small piece of putty to keep it in place. Now I can finally enjoy them.
Click here for my blog post about the Hoya cards.
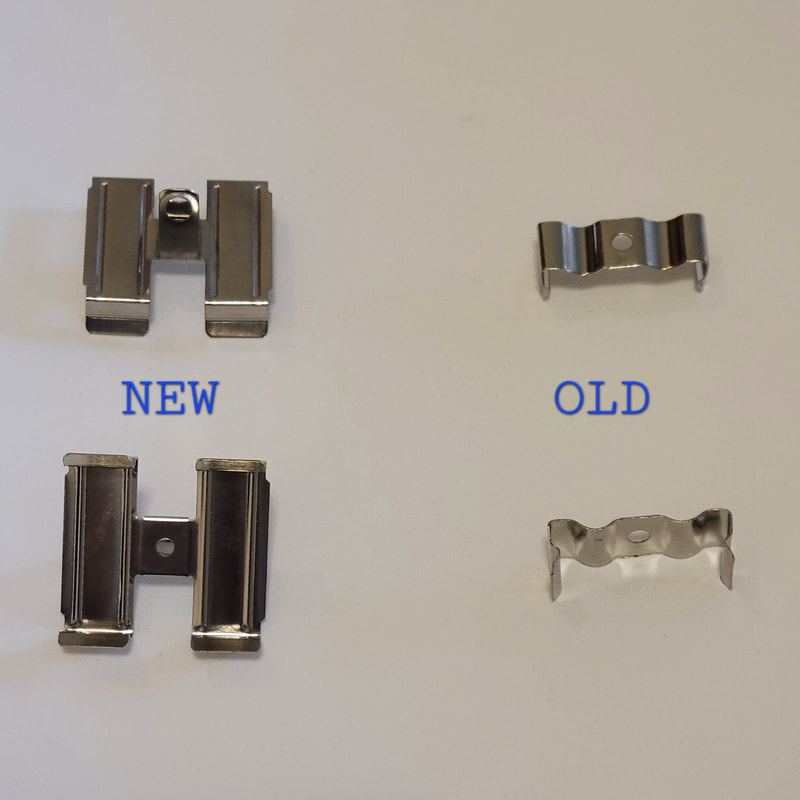
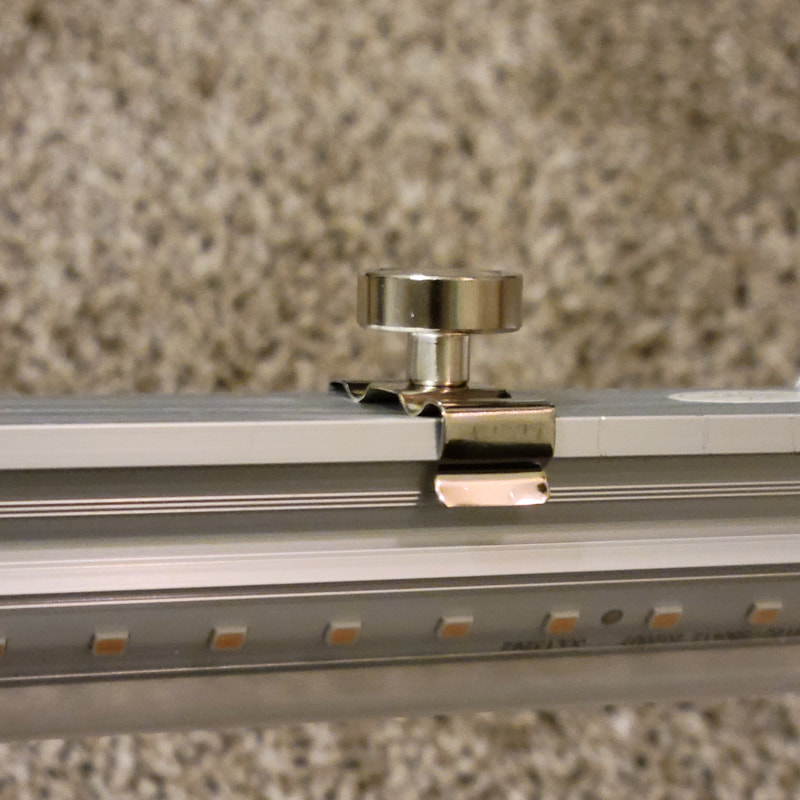
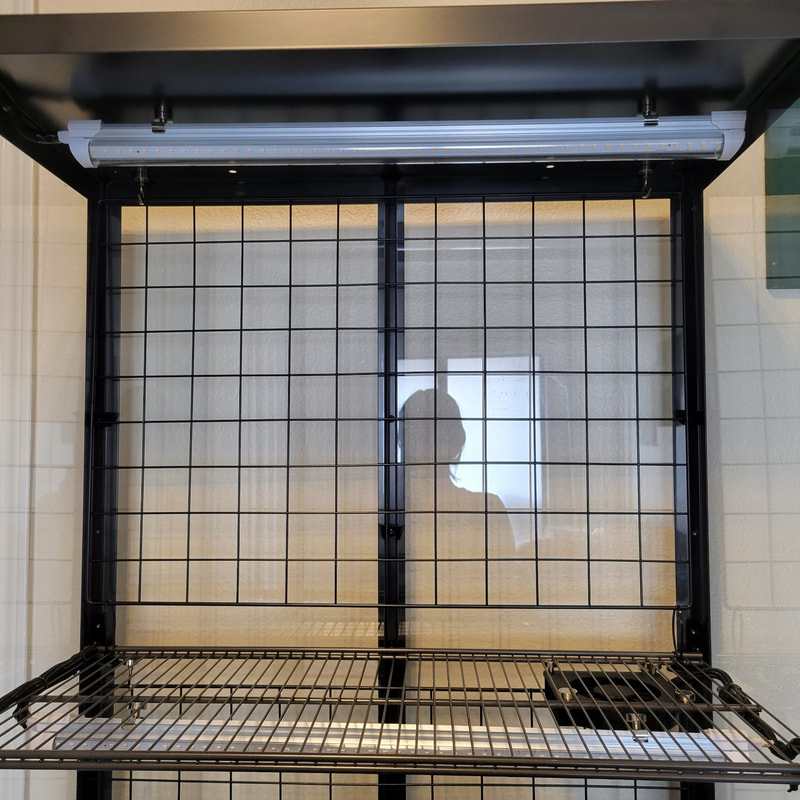
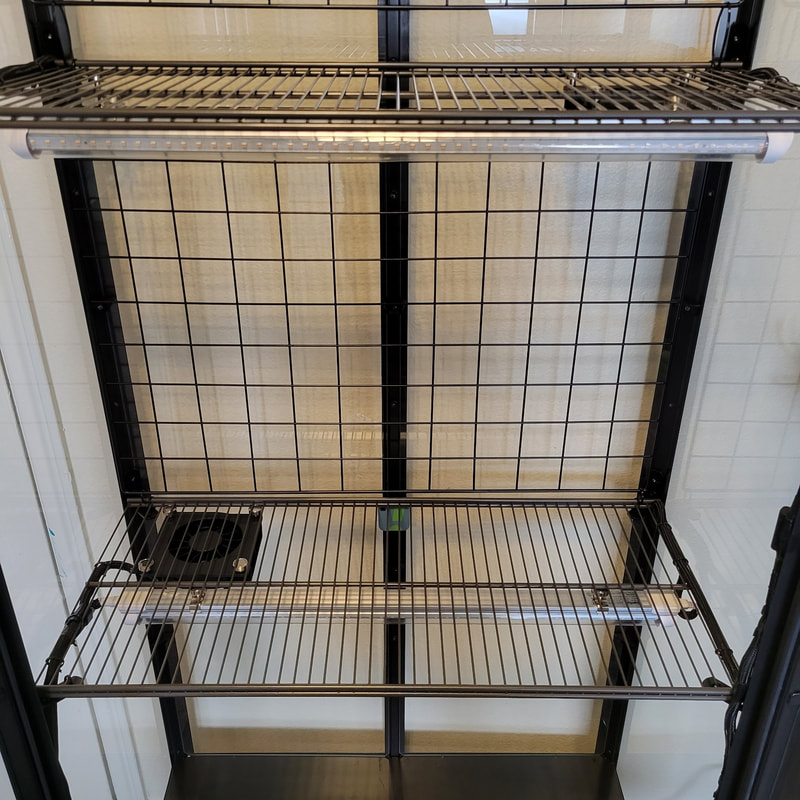
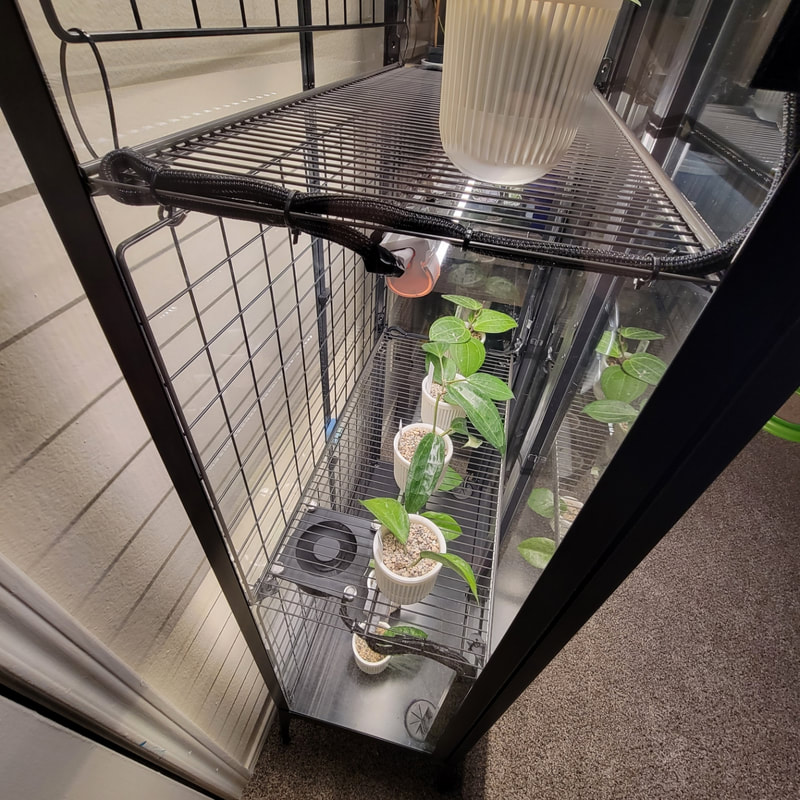
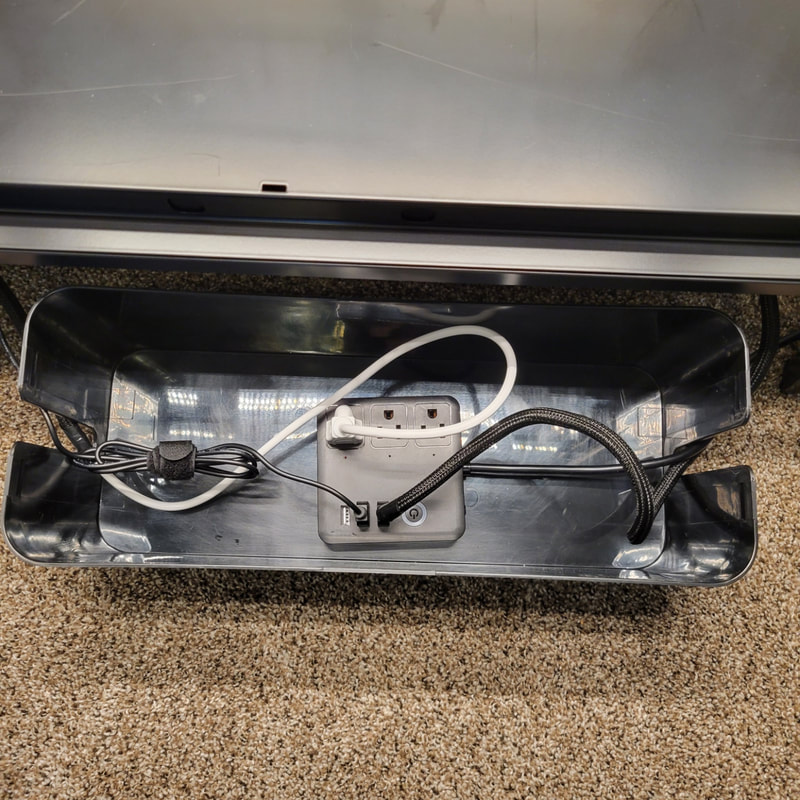
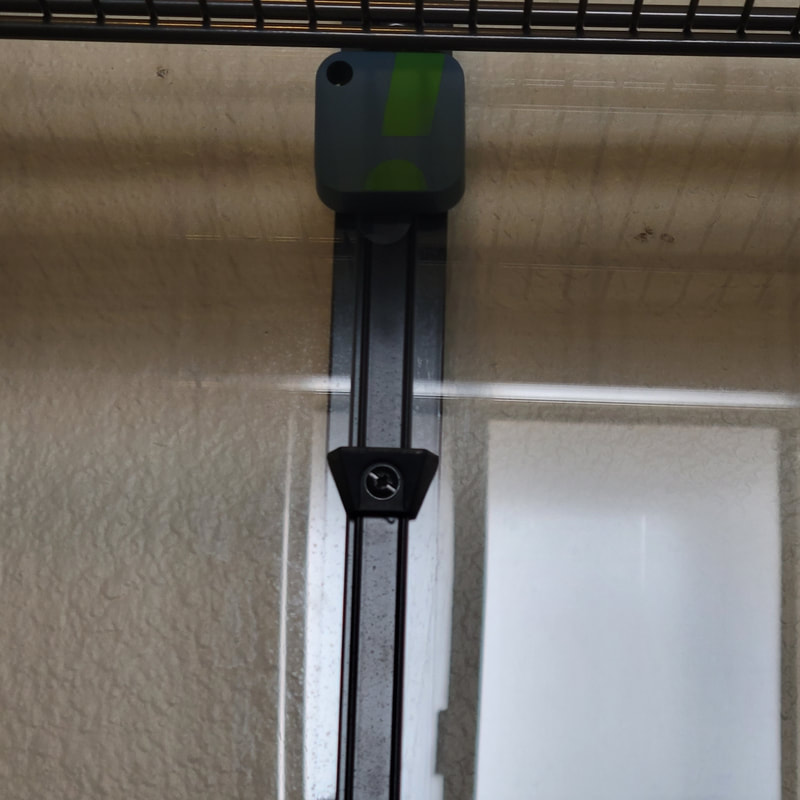
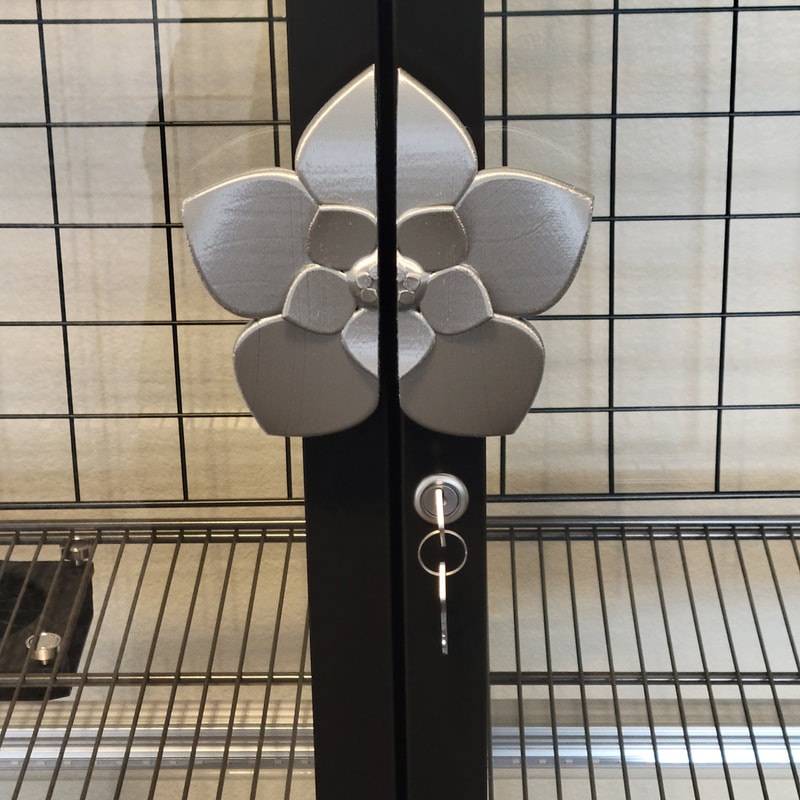
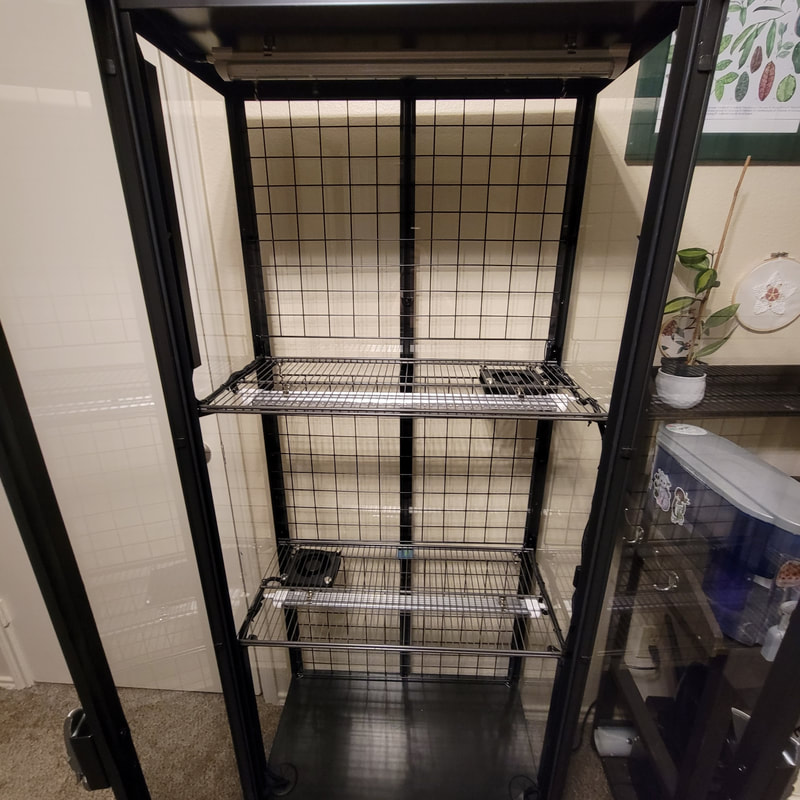
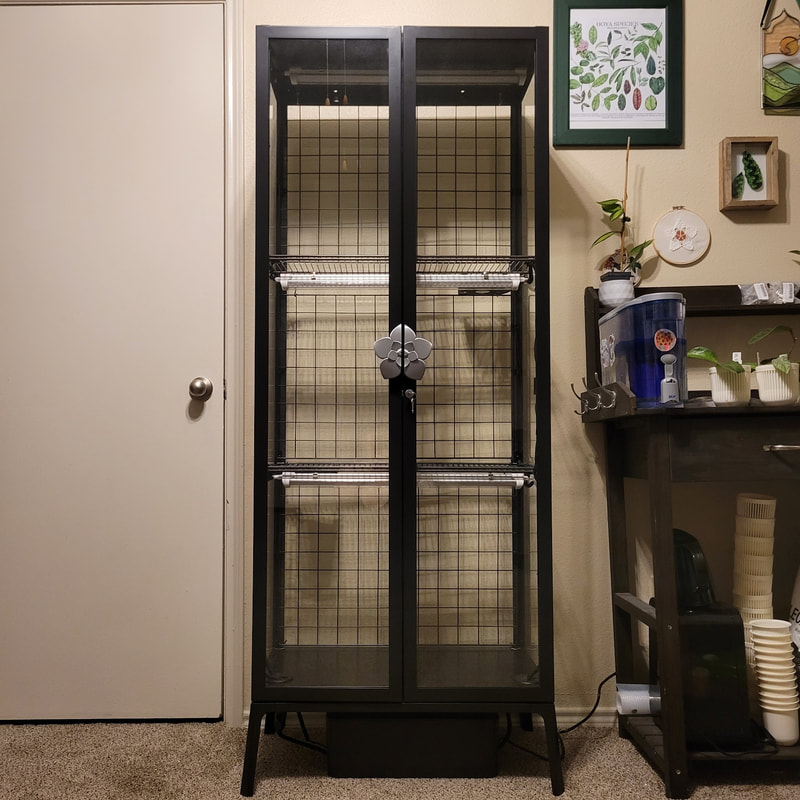
I recently sold my Hoya collection as well as my greenhouse tent set up. I am restarting my plant collection from scratch with a few cuttings. I decided it was time for an upgrade. This time around I don't plan on having as many plants so I am opting for an IKEA milsbo greenhouse. I love the sleek look of the cabinet. I was looking on the Ikea Greenhouse Club Facebook group for inspiration and ran across a post by Stasick Burdeynyy and absolutely loved how aesthetically pleasing it is. CLICK HERE FOR AMAZON BUILD LIST. CABINET BUILD MASTER LIST: Milsbo cabinet Hole Saw Grommets WD40 Corrosion Inhibitor Cable Management Box Cable Hider Cord Protector Electrical Tape Smart Power Strip Wireless Hygrometer Wall Grid (x2) Cable Ties Fan (x2) USB Cover Caps Screws M4x8mm (top fan) Screws M4X20mm (bottom fan) M4 nuts (bottom fan) Magnetic Hooks (x2) Barrina T8 Grow Lights Extended Connector Light Cables (optional) Screws M4X6mm (for lights) Bracket Hangers Elfa Wire Shelf 12x3 (x2) L Shaped Brackets Screws M4X10mm (for brackets) Silicone & Foam Weatherstripping Hoya Flower Door Handles I did run into a small snag with the brackets for the grow lights. The tutorial linked to Stasick's post is using the old brackets that the lights used to come with before Barrina changed them. I was able to get the old bracket hangers on Amazon. Click here to watch the magnet light assembly. The supplies used list is slightly different from the one on that post. Thread the screw on the underside of the bracket and up into the magnetic base. You do not need the use the hook part of the magnetic hooks. Depending on how many shelves/lights you want in your cabinet you might need to buy longer wire connectors to daisy chain the lights together. I did three lights in my cabinet and was fine with the standard issued cords. If you choose to do two lights, I would recommend getting the extended connectors. LIGHT SUPPLIES: Screws M4x6mm Magnetic Hooks Bracket Hangers Barrina T8 Grow Lights Extended Connector Light Cables (optional)
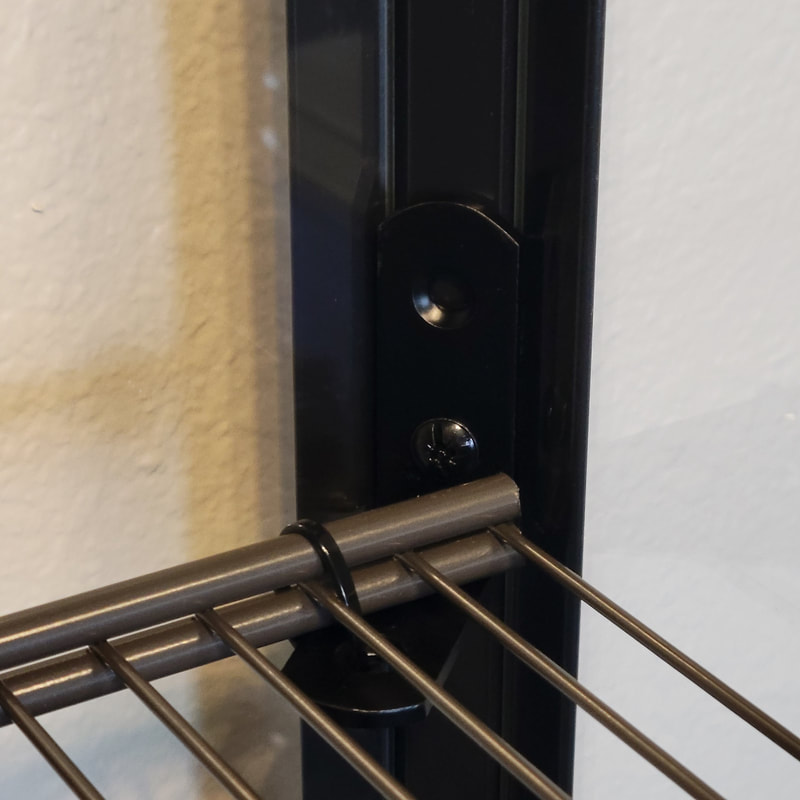
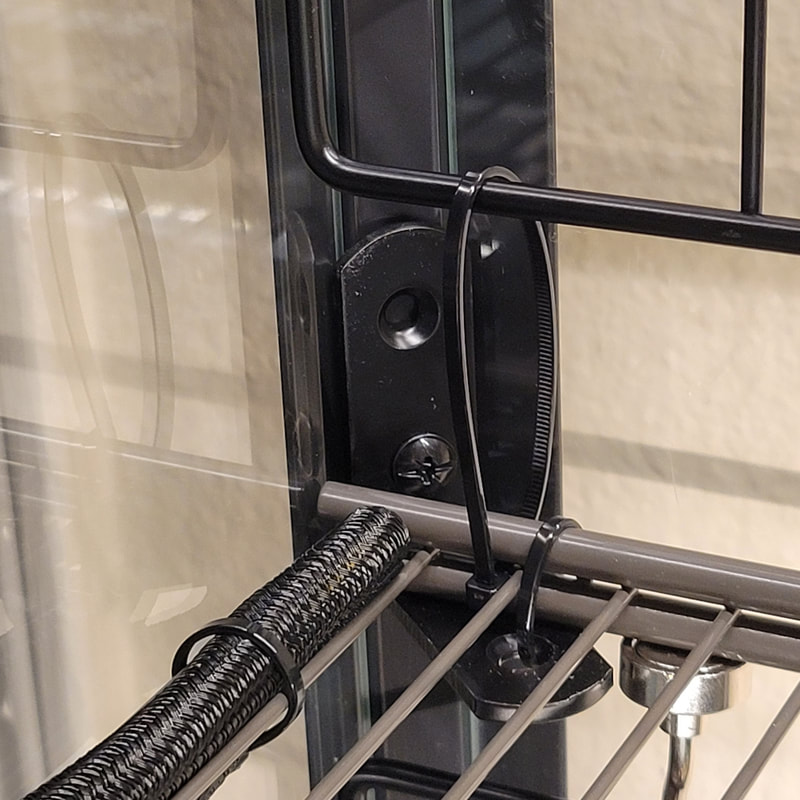
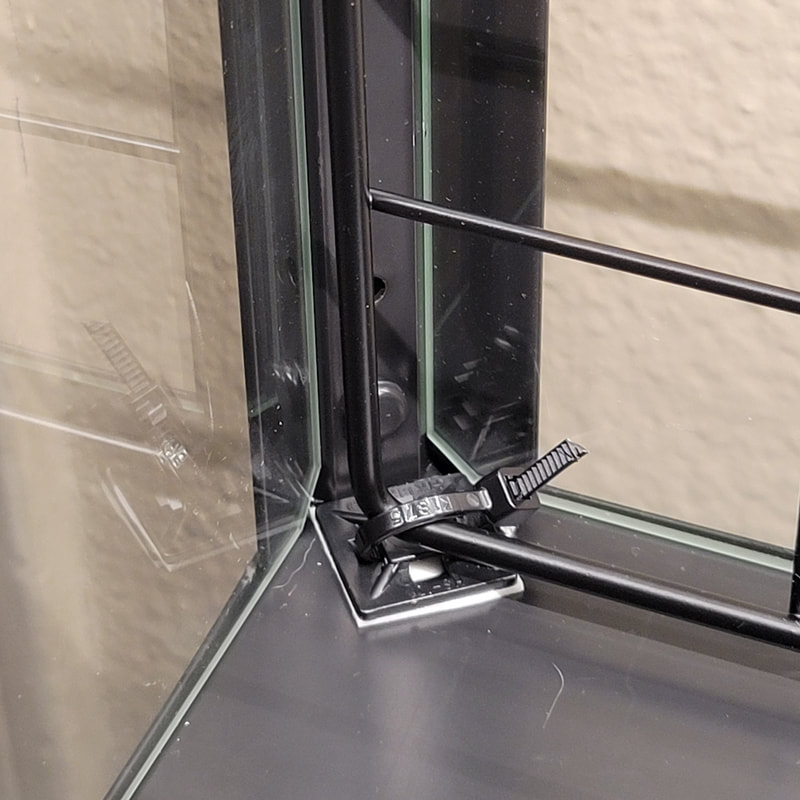
For the wire shelves you do have to have them cut down to the width of the Milsbo cabinet which is 26 inches. If you purchase the wire shelves listed below from the container store when you check out it'll give you the option to have the shelves cut. Make sure to purchase the 12" x 3'. The brackets are installed using the pre-existing holes of the Milsbo cabinet. I used four brackets per shelf and only screwed in the bottom hole of the vertical side. I opted to use all of the rubber stoppers which is why I needed additional screws for the brackets. By using the rubber stoppers your cord management won't be as clean but the glass panels will be better secured. To secure the shelves I did zip tie the inner corners of the brackets to the shelf corners.
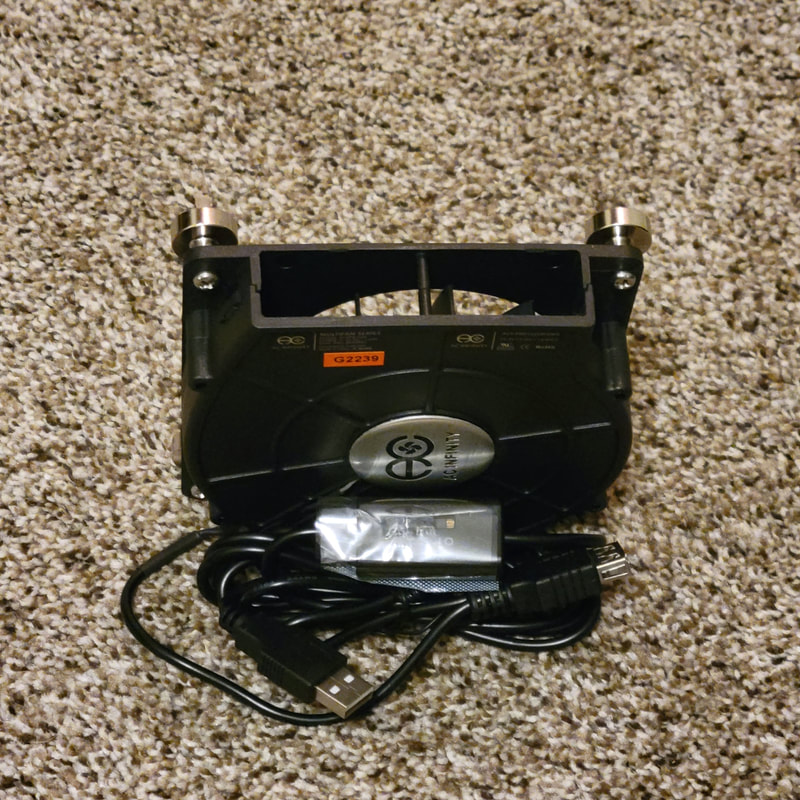
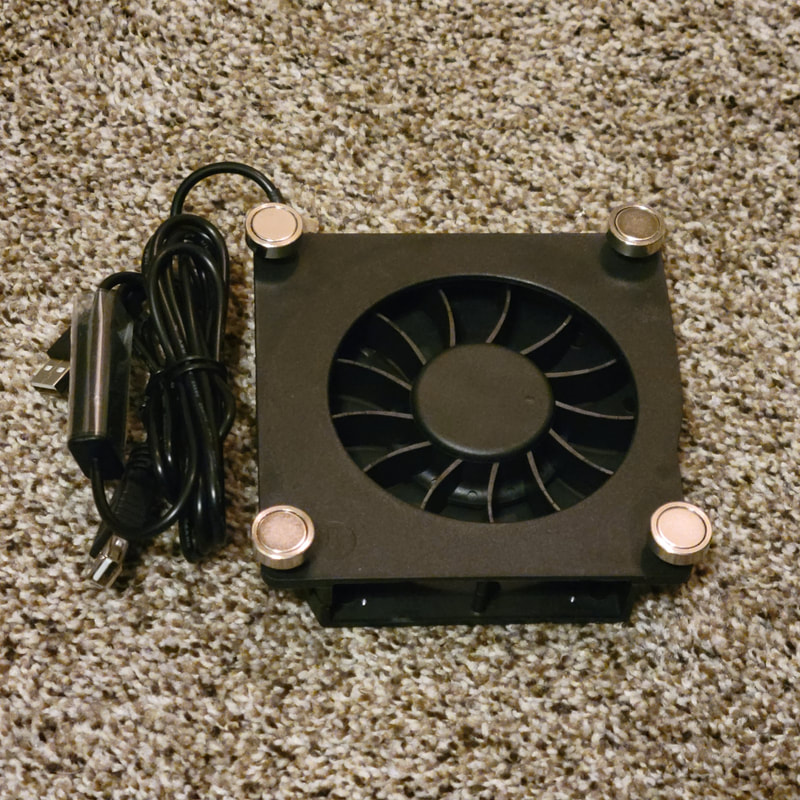
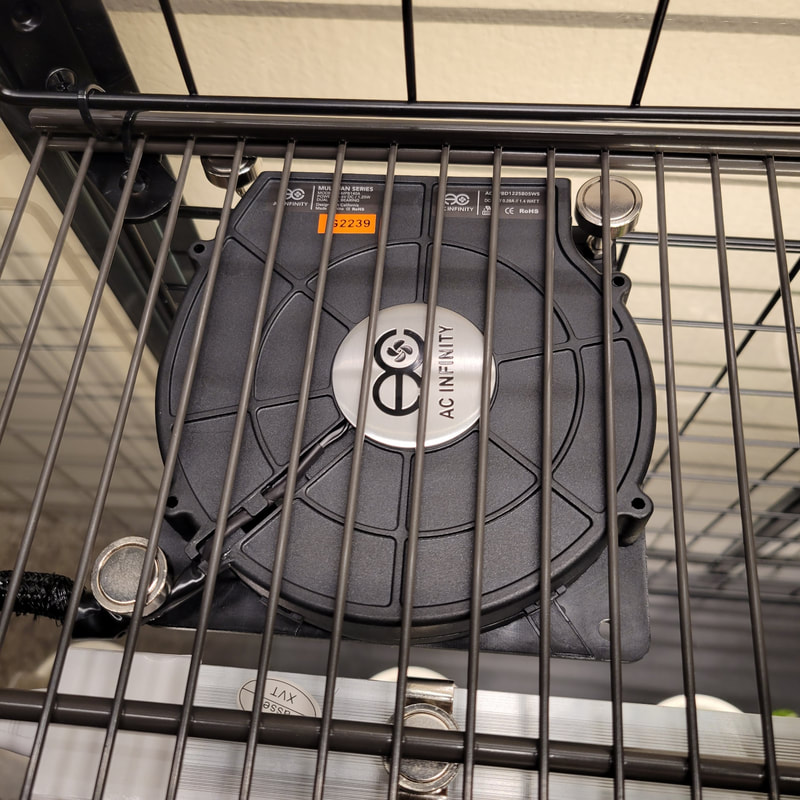
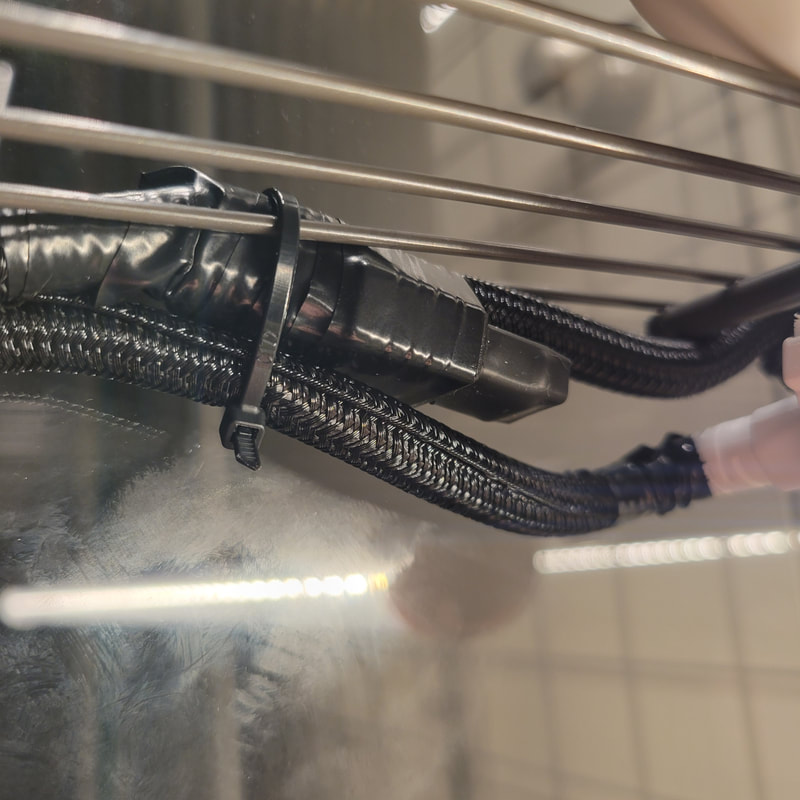
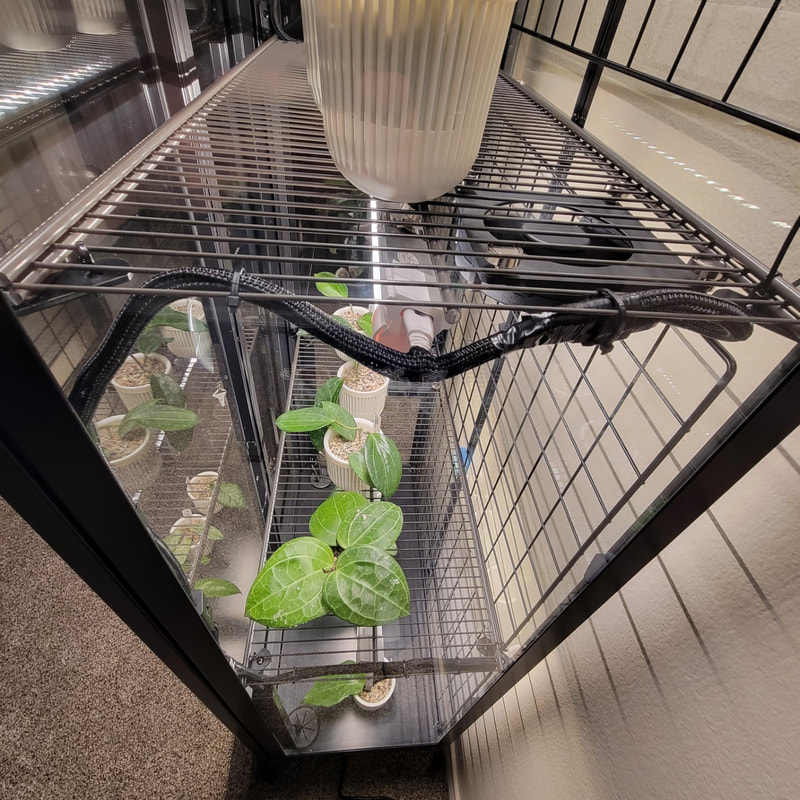
To install magnets into the fans you will first need to take out the rubber stoppers in all four corners. Thread the screws through the fan and into the magnetic base. You do not need the use the hook part of the magnetic hooks. The fan on the top shelf I assembled it as depicted in the second image using M4X8mm screws. For the bottom shelf fan, I faced the fan downward and only used two magnetic bases as depicted in the third and fourth images. Due to the thickness of the fan utilizing the fan this way requires M4X20mm screws which I used a nut to secure before twisting the magnetic base on. I chose to face the fans in opposite directions to help air flow instead of both fans blowing air only upwards. Also, there are two USB plugs on each fan. I used a cover cap on the shorter USB wire to prevent moisture from getting into it. FAN INSTALL SUPPLIES: Fan x2 USB Cover Caps Screws M4x8mm (top fan) Screws M4X20mm (bottom fan) M4 Nuts (bottom fan) Magnetic Hooks
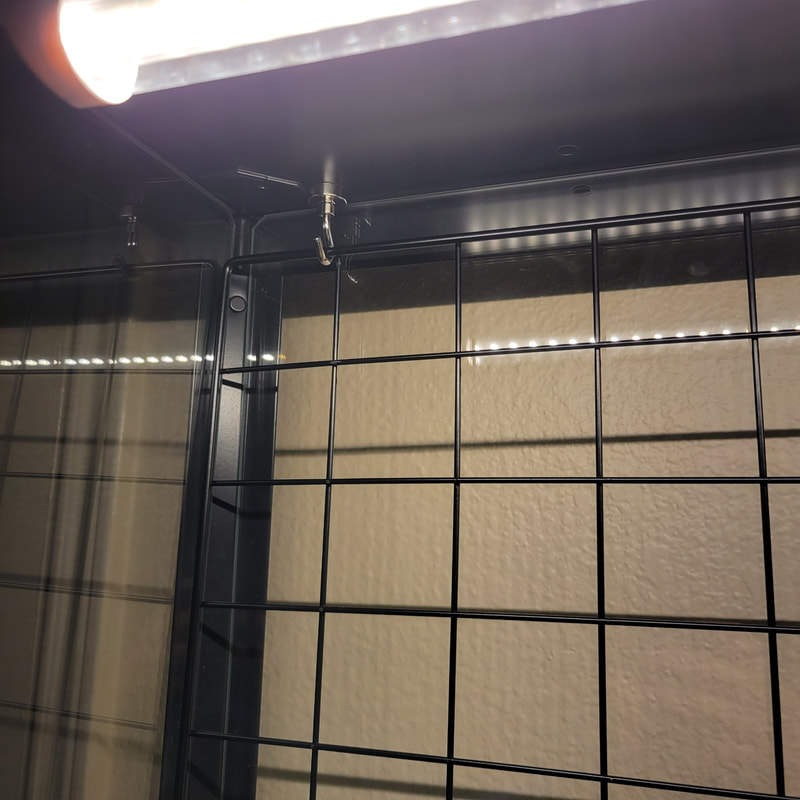
For the first wall grid I used magnetic hooks to hang it from the roof of the cabinet. I then secured the bottom with zip ties in both corners that tied down to the first shelf. The second grid I attached the magnetic hooks to the bottom of the top shelf and again secured with zip ties to the corners of the second shelf. The third wall grid I attached magnetic hooks to the bottom of the lower shelf and secured with 3M adhesive zip ties Those specific adhesive zip tie mounts came with either the cable management box supplies or the fans.
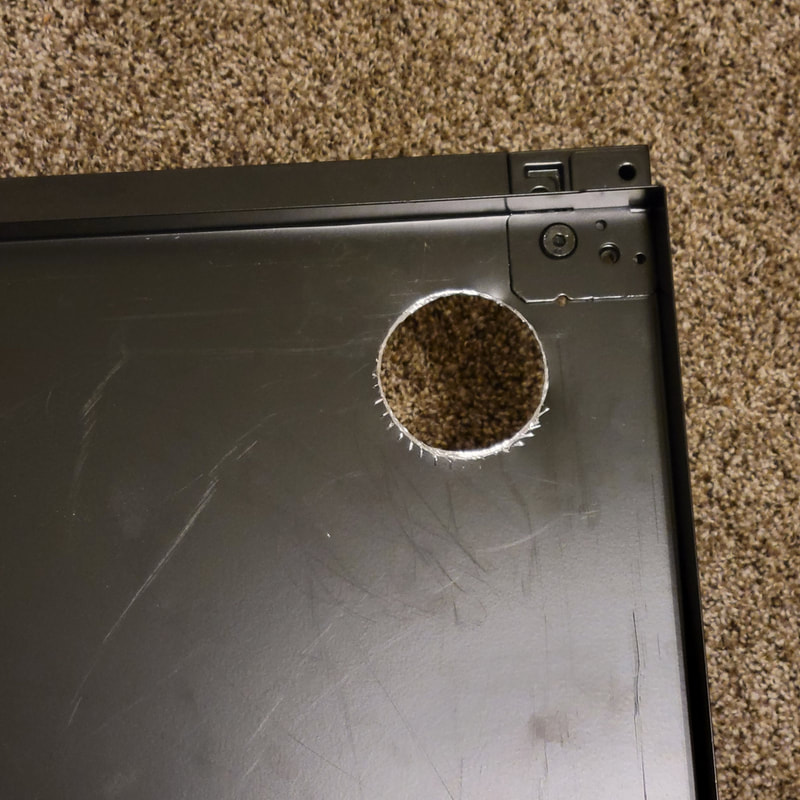
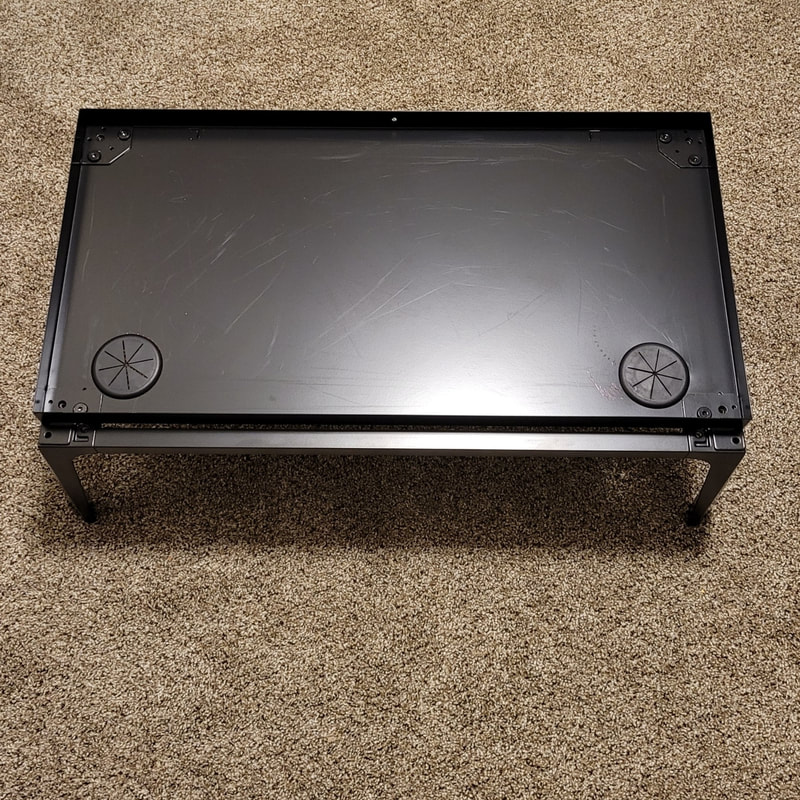
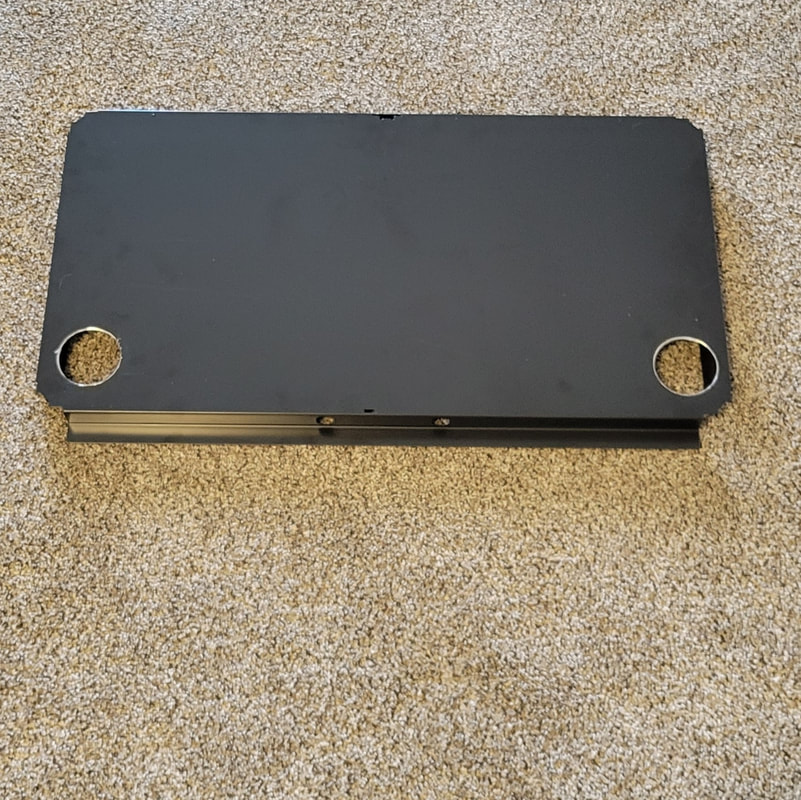
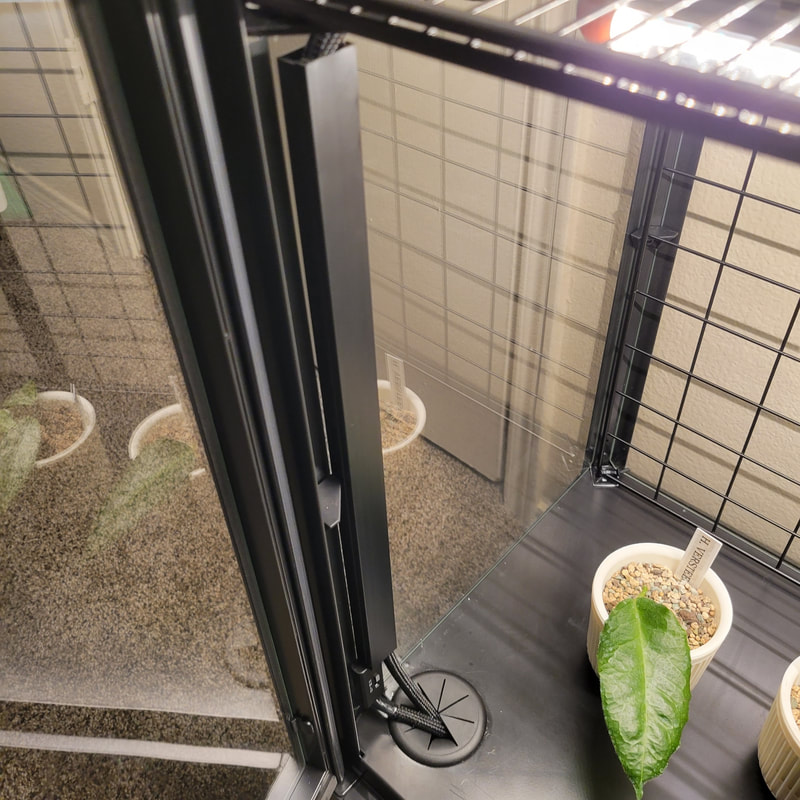
For the hole saw bit you do need to have access to a drill. I know that sounds intuitive but I didn't realize all I had was a gyroscopic screwdriver and the hole saw bit did not fit. If you don't have a drill, you can get a cheap RYOBI 18V drill from Amazon for around $30. That is the same drill I ended up using. Also, when you do drill the holes, you have to be mindful where the legs are and not put the holes too close. There are two separate panels that need to be drilled through. I ended up drilling one hole on each side of both panels. I did read that some people use a cone drill bit instead of the hole saw. It definitely is hard work getting through the metal and takes a little patience. The key is to make sure the drill is spinning the right way (not in reverse) and use light pressure. Some people spray WD40 before drilling to make it easier. I did not try that so I can't speak to that. For my cabinet I decided to put the holes in the front instead of the back so I can hide the cords better. I know some people are now just drilling a hole in the top and storing everything on top of the cabinet to reduce any water dripping into the electrical components. After all the holes were drilled, I checked that the grommets would fit in. My base holes were not super clean so I did go in with a Dremel and smooth around the edges until I could push the grommets in. Drilling through the panel that sits on top of the base seemed to be easier and didn't require any post drill sanding down with the Dremel. Next, I removed the grommets temporarily so I could spray the holes with WD40 corrosion inhibitor to prevent rust on the raw edges. I heard that STA-BIL rust stopper works well too. The spray doesn't dry down so I cleaned up the excess residue and put the grommets in for good.
Depiction: holes drilled on base before shelf bottom was installed
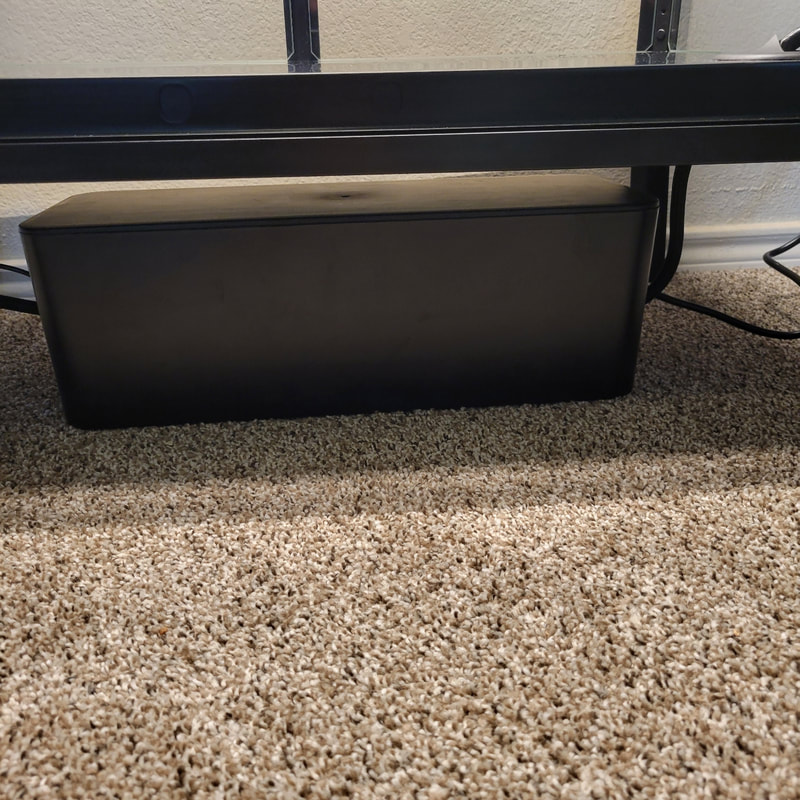
Depiction: holes drilled on bottom panel of cabinet before installation One of the hardest parts of putting together the cabinet is getting the cord management to look really neat and clean. One issues I ran into was with the rubber stoppers. The stoppers hold the glass panels in the cabinet and also are used to support the glass shelves. I noticed in Stasick's video he only put the stoppers in the top and bottom corners of the cabinet. I opted to use them all just to keep the integrity of the glass. By doing this it made the path for the cords to travel down uneven. Using a cable hider on the sides of the glass helped give it a cleaner look. I wrapped all the cords with cord protector. I also used electrical tape to secure the extra USB fan wire to the cord protector so it would protrude less. I put USB cover caps over the smaller USB fan wire on each fan. CORD MANAGEMENT SUPPLIES: Cable Management Box Cable Hider Cord Protector Electrical Tape Smart Power Strip
I put the silicone door seal flap on the left door before screwing on the handles and locking mechanisms that way it sits flush. Additionally, I used a hairdryer to make sure the adhesive sticks better by heating it up for a minute. You can also clean with alcohol before applying the strip to get a good seal. I applied the seal on the left door intentionally because I'm right-handed. With this type of weatherstripping you do have to make sure to close the one door before the other every time you open the cabinet. When I applied the teardrop silicone door seal to the sides of the doors, I made sure to face the tip of the teardrop towards the inside corner of the doors. The foam weather strip I applied to the top and bottom edges of both doors. Click here to watch a video of the finished weatherstripping. WEATHERSTRIPPING SUPPLIES: Foam Weather Strip Tape (top/bottom of doors) Teardrop Silicone Door Seal (sides of doors) Silicone Door Seal Flap (front door gap)
The hygrometer I attached to the back wall of the cabinet using clear 3M adhesive. Set up directions were easy to follow using the required app. The 3D printed plastic door handle covers just slid over the existing metal door handles.
Click here to watch a video of my complete build.
I've been hearing a lot about flat mites lately among my local Hoya community as well as the broader community as a whole. It seems like this is a wide spread issue that has been going around everyone's collections. As far as I'm aware I have not personally dealt with them however I think it is important to share resources I've seen for anyone who may be dealing with them.
In the July 2022 issue of the Stemma Hoya journal there is an article on pages 21-28 that talks identification, detection, life cycle, treatment, and prevention of flat mites. Adam aka Knot Dude on YouTube also has a really great video about flat mites. Click here to watch that. I really liked the detailed pictures he showed on identification. A few weeks ago I was listening to episode 2 of Let's Talk Hoya. I believe it was Adam that mentioned he used Hydroguard as well as PureCrop1 in his plant care. I have been meaning to try Hydroguard since March but never got around to purchasing it. Instead, I let it sit in my Amazon save for later list till I listened to this episode and decided to finally try it. Hydroguard is supposed to help with root rot which is perfect because I tend to overwater. I have been using it for the last few weeks in LECA as well as LECHUZA-PON. Hydroguard can be used in soil or hydroponic gardens. So far, all my roots seem to be happy and I have no complaints. Also, you only have to use 2 ml per 1 gallon of water so 1 quart of Hydroguard is going to last a long time. The main ingredient in Hydroguard is bacillus amyloliquefaciens. This bacillus grows near plant roots which stimulates growth and can suppress pathogenic bacteria and fungi. Note that this product is to be used as a preventative and not to cure an already diseased plant.
Before listening to this episode, I had not heard of PureCrop1. This product piqued my interest because I have been dealing with root mealybugs the last couple months. PureCrop1 is marketed as an insecticide as well as fungicide. PureCrop1 is 100% plant based and is considered food grade. I have only used it a few times on a large Hoya that has had root mealybugs that I didn't want to chop and prop. Granted, I haven't been following the directions properly (oops). I have only added it into the water for said plant about once a week during my normal watering schedule. The product is intended to be used as a soil/foliage drench for 3-4 days in a row. The directions also suggest to continue using it at a lower dilution every 7-12 days after that. References: Siemering, Geoffrey. (2016). The Value of Bacillus amyloliquefaciens for Crop Production. Microbial Cell Factories. https://www.researchgate.net/publication/326816582_The_Value_of_Bacillus_amyloliquefaciens_for_Crop_Production Within the last couple months, a new Hoya themed podcast has been on air. If you are familiar with the shop The Green Plant AZ run by Lydia she is one of the three hosts of the show along with Jessi and Adam. I've personally been enjoying their content and it has inspired me to try some new things in my Hoya care routine.
Click here to access via Google Podcasts. Click here to check out their Instagram. STEMMA is an online pdf magazine that talks about all things Hoyas.
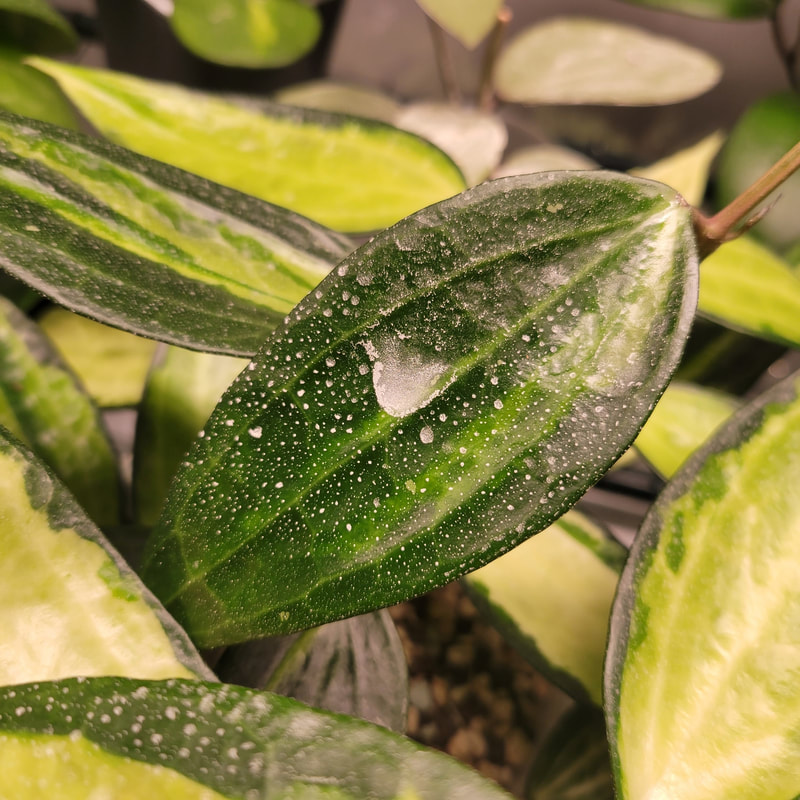
Click here to access their website. Click here to access the Facebook group. One product I've just started to experiment with is sulfur. Sulfur use in the Hoya community seems to be on the rise due to the increase in mites among collectors. It can be used to treat various pests such as mites, thrips, and scale. It also has been effective in treating powdery mildew. I purchased the Bonide sulfur dust. You can use sulfur in dust form, mix it with water to make a spray, or mix with water to create a paste to paint on. I opted for the spray as I decided to treat my whole collection. To make the spray combine 3 tbsp per 1 gallon of water. The sulfur mixture can clog up spray bottles. I used my usual glass spray bottle and didn't notice any issues. The spray will leave a residue on your foliage and it does have a slight odor. It is recommended to wear a mask while spraying. Additionally, it is stated on the label to not spray during hot temperatures and do not use sulfur within two weeks of an oil spray such as neem. My plan is to leave the sulfur on the foliage. From what I've heard you can either leave the sulfur on the leaves or wipe it off. If you choose to wipe it off I would give it two weeks and then wipe off with water or leaf shine.
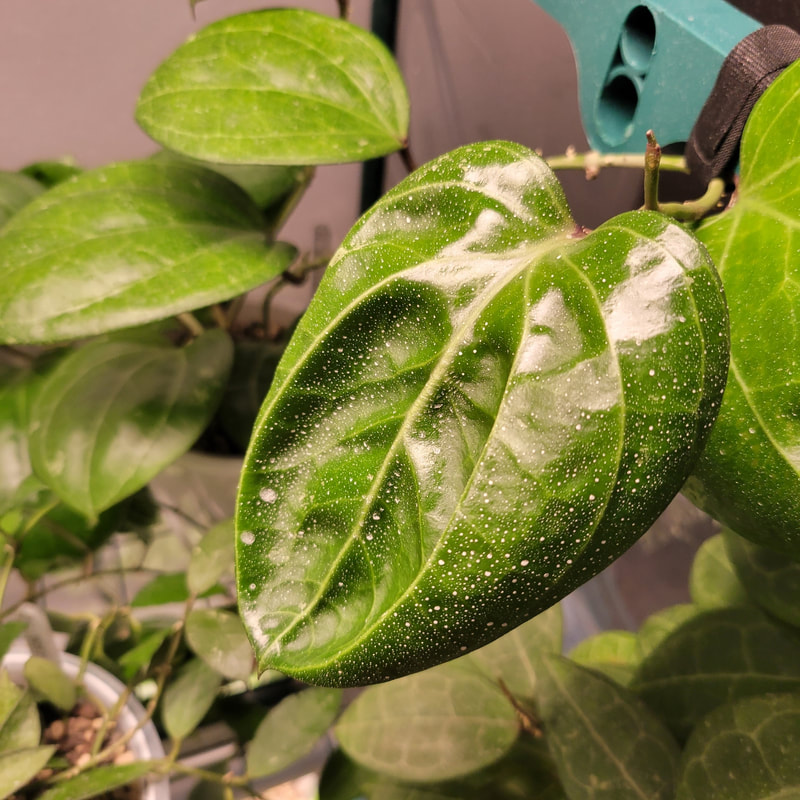
I also experimented with the paint on method via H. 'Silver Dollar'. The other day I noticed that three of the leaves had some type of unknown scabbing on them and I figured a treatment of sulfur couldn't hurt. I didn't measure out a ratio of water to sulfur dust while making the paste. I mixed enough water into the sulfur to get a pasty texture. I used a paint brush and went to town. If you do paint on the sulfur, I would recommend wiping it off within a week or two because most likely it will be harder for the plant to photosynthesize properly with globs of sulfur on the surface of the leaves.
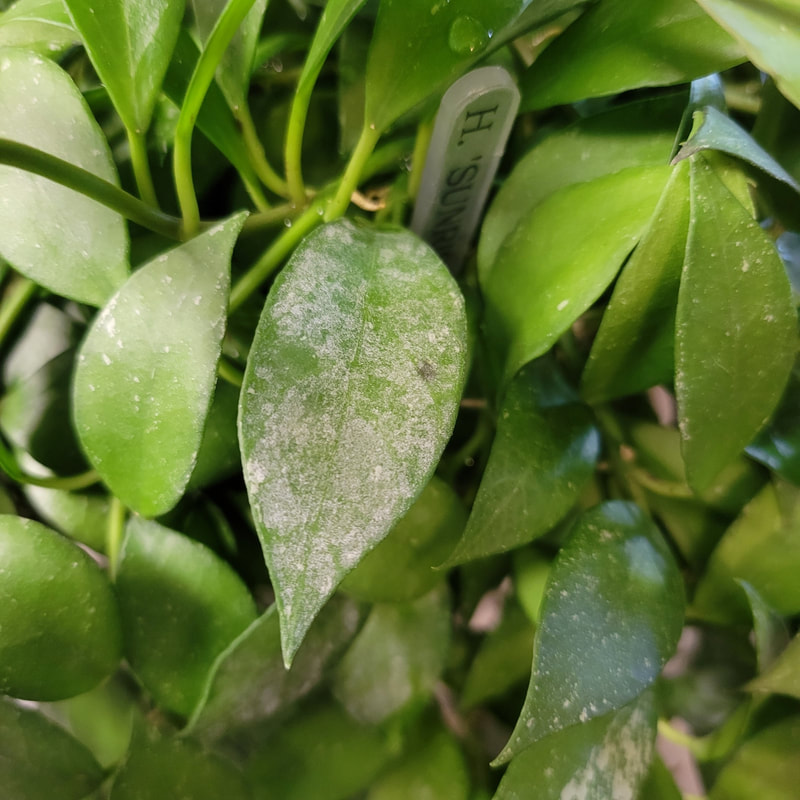
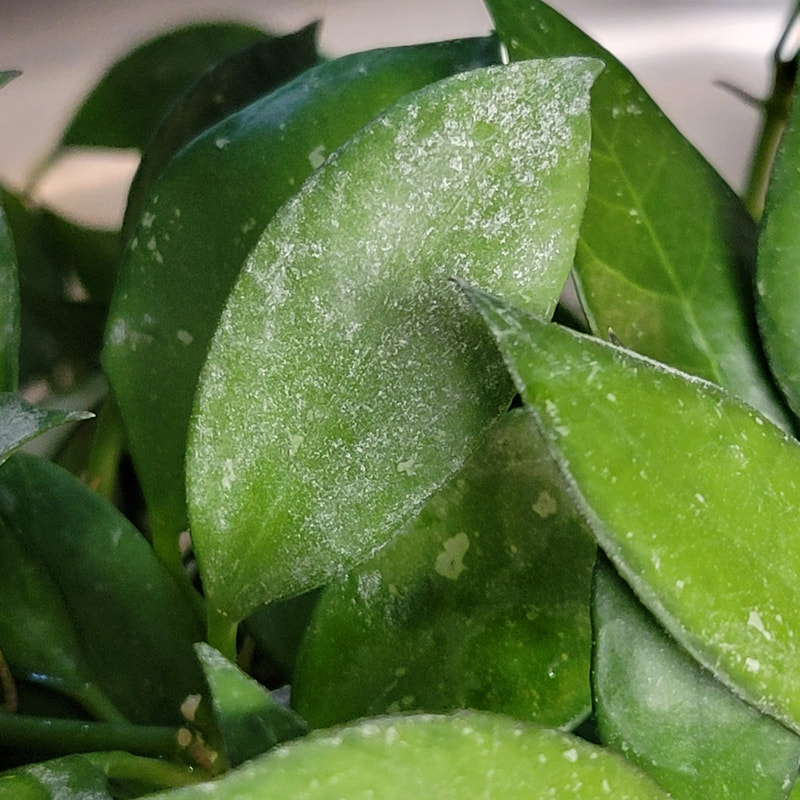
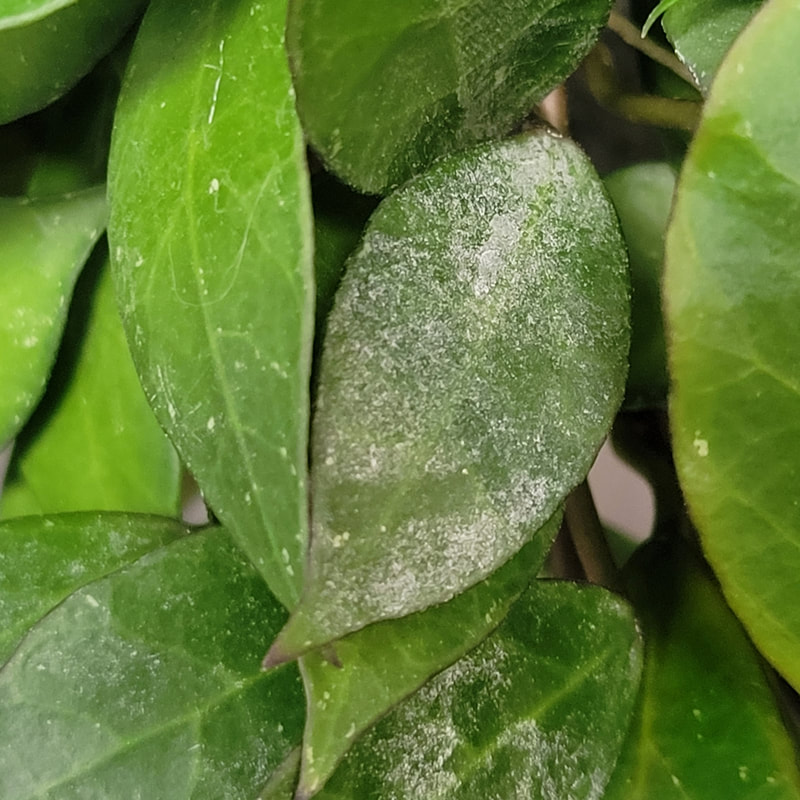
Sulfur is also a fertilizer and can help promote plant growth. It will decrease soil pH as well as sodium levels. I have heard good things about people seeing new growth on their Hoyas from using sulfur two weeks after application. Moreover, I read on one of the Facebook Hoya pages that you can water sulfur into the soil to help with bacterial infections. The user said to mix 1 tsp of sulfur per 16oz of water. It seems like there are a lot of benefits to using sulfur and hopefully I will be experiencing them soon. I noticed what I assumed to be powdery mildew on my Hoya Sunrise x unknown. This plant in particular I grew from seed and is just shy of being a year old. Certain vines on the plant had a white flour-like substance on them. I treated it multiple times with cooper fungicide but didn't notice any difference. I also used leaf shine to wipe off the leaves individually but it didn't seem to help. I saw someone post on one of the national Facebook groups about this issue and it was commented that it might be salt build up on the leaves. The recommendation was a 1:1 ratio of water and alcohol to wipe down the leaves. I tried this as well with no luck solving the problem.
My latest attempt has been spraying on sulfur. There are still a few noticeable spots on some of the affected leaves but they don't look quite as powdery as before. Hopefully, another sulfur treatment or two will take care of the issue.
|
Archives
March 2024
Categories
All
|


 RSS Feed
