|
A few weeks ago I was listening to episode 2 of Let's Talk Hoya. I believe it was Adam that mentioned he used Hydroguard as well as PureCrop1 in his plant care. I have been meaning to try Hydroguard since March but never got around to purchasing it. Instead, I let it sit in my Amazon save for later list till I listened to this episode and decided to finally try it. Hydroguard is supposed to help with root rot which is perfect because I tend to overwater. I have been using it for the last few weeks in LECA as well as LECHUZA-PON. Hydroguard can be used in soil or hydroponic gardens. So far, all my roots seem to be happy and I have no complaints. Also, you only have to use 2 ml per 1 gallon of water so 1 quart of Hydroguard is going to last a long time. The main ingredient in Hydroguard is bacillus amyloliquefaciens. This bacillus grows near plant roots which stimulates growth and can suppress pathogenic bacteria and fungi. Note that this product is to be used as a preventative and not to cure an already diseased plant.
Before listening to this episode, I had not heard of PureCrop1. This product piqued my interest because I have been dealing with root mealybugs the last couple months. PureCrop1 is marketed as an insecticide as well as fungicide. PureCrop1 is 100% plant based and is considered food grade. I have only used it a few times on a large Hoya that has had root mealybugs that I didn't want to chop and prop. Granted, I haven't been following the directions properly (oops). I have only added it into the water for said plant about once a week during my normal watering schedule. The product is intended to be used as a soil/foliage drench for 3-4 days in a row. The directions also suggest to continue using it at a lower dilution every 7-12 days after that. References: Siemering, Geoffrey. (2016). The Value of Bacillus amyloliquefaciens for Crop Production. Microbial Cell Factories. https://www.researchgate.net/publication/326816582_The_Value_of_Bacillus_amyloliquefaciens_for_Crop_Production
0 Comments
I have made a few more changes to my fertilizer line up since September so I figured I would do another update.
Semi-hydro (LECA / PON) plants: - Stopped using Osmocote - Still using Cal-Mag - Started Fox Farm Cultivation Nation (3-part liquid fertilizer) The cultivation nation can be used in soil or semi-hydro. Click here to access the feeding charts. I use the semi-hydro dilution chart in BOTH my semi-hydro and soil plants. Note that the diluted strengths of the feeding charts differ between semi-hydro and soil. I like how the feeding chart takes in account the use of the Cal-Mag. Soil plants: - Still using Osmocote - Still using Cal-Mag - Started Fox Farm Cultivation Nation (3-part liquid fertilizer) - Stopped Grow Big fertilizer I did like the Grow Big fertilizer but I stopped using it because I didn't want to be using too many products and risk fertilizer burn. Click here to read about my previous fertilizer update Sep 2021 . Click here to read about my previous fertilizer update May 2021 . Something I continue to struggle with 3 years into houseplants is watering frequency. Using different grow mediums have a major influence on watering schedules. Previously, I used a soil mix of pumice, Foxfarm ocean forest, and bark. Click here to be taken to the recipe. This mix dried out fairly quick in my environment and I could get away with watering weekly without having much of a problem. This mix in particular was great for my over watering tendencies. I experienced very minimal root rot.
I tried a lighter airy mix consisting of coco coir croutons, charcoal, coco coir, worm castings, and pumice. Click here to be taken to the recipe. I found that I only had to water every 10-14 days with this mix. However, due to my watering tendencies I had a hard time waiting that long and eventually transitioned out of that mix due to root rot issues. After my soil experiences, I decided to go completely semi-hydroponic. Most of my collection is still in DIY pon. Click here to be taken to the recipe. I haven’t quite decided after 4+ months of using it if I love it. I think for anyone who tends to overwater, pon is probably not the best medium. My current watering routine involves using a reservoir and watering every 10-14 days depending on size of leaves. Small leaf Hoyas need more frequent watering because they can’t hold as much water in the leaves. I let the water sit for a day or two and then I dump out the reservoirs. I have experienced quite a bit of root rot using pon and switching up my watering habits to 10-14 days has definitely helped. I also recently bought “the perfect pot for semi-hydroponics” by Planty Queens. I have been using them for a few weeks and so far, I like them. I haven’t noticed root rot which was my main concern with the wick system. I have only had to refill the basin up once and I did let it completely dry for a week just to help prevent root rot. I have heard of people adding in a drop or two of hydrogen peroxide to the reservoir for root rot prevention but I have not personally tested that out.
Additionally, I use LECA but not as a permanent grow medium. I find great success in using LECA for cuttings. I use a reservoir and keep it filled up to a certain point on a heat mat. Click here to read about LECA propagation. I have been meaning to try LECA as more of a long-term medium but haven’t done so yet.
I have also been experimenting with transitioning from pon to plain coco coir. I figured since I do over water if I switch to coco coir it will dry out fairly fast and I can water more on a weekly basis. I would say 95% of the Hoyas I transferred took to the coir really well and are going strong. I did use a heat mat during the initial few weeks post transfer to promote root growth.
If you find yourself overwatering your plants consider switch from a plastic nursery pot to a terracotta pot. Terracotta is moisture wicking and will help suck up some of the water. Regardless, watering is something highly variable with your environment and grow mediums. Click here if you need help with root rot.
For the past year I have been using Neptune's Harvest as my only fertilizer. Click here to read the details of that. I have finally decided to try some new products out in my greenhouse tents.
First, I have invested in some Osmocote. I see some of the well-known Hoya growers using it and I figured it must be doing something! April from Unsolicited Plant Talks (UPT), uses Osmocote (NPK 14-14-14). I believe Gardino's Nursery also uses this product but I am unsure what NPK ratio. The nice thing about this product is that it supposedly lasts for 4 months before needing re-applied. However, in my limited time using it I have noticed that the fertilizer pellets fall out all the time. To try to mitigate this, I have mixed Osmocote into my batches of soil to hopefully keep more of it in my pots. The next product I am trying out is FoxFarm Grow Big. I am super excited to see if I get better growth from using this product than Neptune's Harvest. I did notice the bottle says to use it every other watering. I am tempted to dilute it to half strength and use it weekly. I know April did a bunch of Q&A and she mentioned she uses it every week along with Cal-Mag. I also read somewhere that you should use it either in the early morning or late evening. I am assuming this has to do with absorption. That brings me to the last product I am also trying out, which is FoxFarm Cal-Mag. I personally like FoxFarm's products so when April mentioned them, I figured it was worth a shot. I had been meaning to supplement my fertilizer with calcium and magnesium but honestly never got around to it. Cal-Mag is supposed to be helpful for increasing growth. One important thing to note when it comes to using Cal-Mag is that you need to maintain a pH range of 5.6-6.8. Having a good pH level is important because it will determine the availability of nutrients. I highly suggest pH balancing your plant water. Click here to read about my latest fertilizer update May 2022.  If you are looking to bring a new plant home from a big box store or even a local greenhouse it is important to thoroughly inspect the plant before you buy it. This can save you from unwanted pests and disease.
What to inspect:
If anything about the plant seems off find another one to purchase. If you do find a plant to buy, make sure to quarantine it from the rest of your collection for 2 weeks. That way if you missed any pests or diseases, you won't be spreading it to all of your plants. I recommend cleaning the foliage with insecticidal soap directly after you bring it home. I would also check the soil and make sure that it is compatible with your plant. A lot of the time big plant greenhouses use very heavy soil that stays sopping wet when watered. I like to repot any new plants I receive in my own soil mix to reduce risk of overwatering/underwatering. Click here to check out my blog on new houseplant protocols for further information. Light:
Hoyas prefer bright indirect light. If you use grow lights, be sure to not leave them on all day. Plants need a period of darkness so 12hrs on and 12hrs off is ideal. Grow medium: Hoyas like to be in a light and airy mixture. You can successfully grow Hoyas in soil, pon, LECA (lightweight expanded clay aggregate), stratum, etcetera. I would use whatever medium you feel comfortable with. Watering: Water with room temperature water as needed. Let the top layer of soil dry between watering. If the leaves are wrinkling between waterings, you aren't watering enough. If you're overwatering and inducing root rot you might notice stunted growth, yellowing leaves, and brown roots instead of white firm ones. Frequency of watering is going to depend on the grow medium used and the environment you have it in. Want to know what type of water you should give your plants? Click here to read an article from Wild Interiors. Humidity: Humidity is preferable for Hoyas due to their tropical nature. To maintain humidity without a humidifier you can use a tray with pebbles and water. Keep plants away from cold windows and away from vents. Leave your Hoya in a room above 60°F. Different Hoyas have different humidity needs. As a general recommendation, I suggest trying to keep your humidity levels between 60-70% for optimal growth. Fertilizing: Fertilizing routine will depend on personal preferences. I dilute fertilizer and use it on a regular basis regardless of the time of year. You can also use slow-release fertilizer like Osmocote that you mix into your grow medium. Click here to read about fertilizers I am currently using. Trellising: Hoyas are epiphytes and typically grow on other plants. Using a trellis is great for training vines. If you have long vines growing but no leaves it is because the plant is trying to secure itself to something before it puts out leaves. Using a trellis will help the plant grow faster. Hoya's with smaller leaves can get away without needing a trellis. Click here to read my post about trellises. Want more in depth Hoya care information? Click here for Homestead Brooklyn's ultimate Hoya care guide.  It is important to keep up with your plants and do preventative care to help prevent pests from taking over. I recommend using systemics which need to be reapplied periodically based on product directions. For my care routine, systemics are my first defense to protect my plants. You can buy systemics in granules as well as liquid form. Granules need watered into your grow medium to be effective.
My next line of defense is neem oil. Neem oil comes in concentrate or premade solution. For neem oil concentrate follow the direction on the bottle. If you plan on using neem oil, make sure to apply it in the evening to avoid foliage burning. If you use concentrate make sure you use warm water and some type of castile or dish soap to act as an emulsifier with the neem oil. I try to treat with neem once a month. Bonide neem oil concentrate: 2 cups warm water 3/4 tsp neem oil concentrate 2-3 drops of free & clear dish soap or castile soap Lastly, I use Physan 20 on a weekly basis typically after watering. This product is used in professional greenhouses to treat fungus, viruses, algae, and is a disinfectant. It can be hard to remember when you used what product and when. I recommend setting reminders in your phone to help keep track of maintenance.  Whether you have 5 plants or 100 you should ALWAYS quarantine new plants. Any time you bring a new plant home it is a great idea to quarantine it for 2 weeks so you can observe it and make sure you aren't bringing in any unwanted pests or diseases to your collection.
The first thing I do with new plants is wipe down each leaf front to back with insecticidal soap. It is critical that you inspect the plants leaves, stems, and soil for pests and disease. Next, I will repot the plant. Depending on the circumstances on how the plant was acquired I might let it acclimate for a few days before repotting. I always repot into my own soil mix as well as give it a clear pot. For me personally, I feel more comfortable having all my plants in my own soil mixture. I worry less about root rot, soil pests, and potentially over/underwatering based on the particular soil amendments used. Next, I add in systemic granules and water the plant thoroughly. Specifically, with granule systemics you need to water them in for effectiveness. It is also important to note that you will have to reup your systemic use periodically. Over time I have switched from using the granules to liquid systemic. Once your plant has completed its 2 week quarantine, make sure to inspect it one more time before integrating it with the rest of your collection. It is also important to isolate plants when you notice pests or diseases. Additionally, if you choose to put your houseplants outside during the warmer months make sure you have pest prevention controls in place and quarantine before bringing them back in. Have you ever looked at a plant and thought the leaves were looking a little sad or maybe the plant just stopped growing? Yeah...well so have I. You might think all is going great with a plant and suddenly you realize that it has lost the will to live because you probably overwatered it or did something to offend it. Depending on the types of plants you keep root rot can be a major issue. About a month and a half ago, I got a Hoya chelsea which I didn't pot up in my normal soil mixture. Instead, I left some of the original bark it came in and mixed it into my usual soil. Well let me tell you that was a mistake on my part. I didn't realize something was wrong until I started to see the beginning of yellowing leaves. Needless to say, I created a lot of work for myself. In essence, root rot is when the roots of a plant start to decay. Root rot is a fungus and typically happens from having a growing medium that is too moist for a plant or from overwatering. Signs can include stunted growth, yellowing leaves, and brown roots instead of white firm ones. Clear pots are great because you can easily see the roots without having to unpot the plant first. Click here to read more about them. Once you have identified that you do indeed have root rot unpot the plant if you haven't already done so. Next, you need to inspect the roots to see which ones are still viable if any. An easy way to tell if a root is still healthy besides color is by tugging at it gently. If the outer part of the root comes off easily and looks like little white thin hairs then it's a goner.  u/a_cup_of_jojo. (2022). Root rot on H. carnosa 'Krimson Queen'. Retrieved February 13, 2022, from https://www.reddit.com/r/hoyas/comments/i762ad/help_is_this_root_rot_idk_what_to_do_ive_only_had/. Use a pair of sterilized shears to cut off all dead/rotted roots. If none of the roots are salvageable you will need to re-root the plant. Before you either repot it or re-root it makes sure you spray down the plant with a peroxide spray to kill any fungus. Peroxide spray: 2/3 cup water 1/3 cup hydrogen peroxide 3% Combine ingredients into a spray bottle and shake well before spraying over roots. If you have a large plant with root rot and decide to re-root consider cutting it up into smaller pieces which will put less stress on the plant and root faster. I would also consider using fresh soil to pot the plant so you do not recontaminate it after doing all that work. My preferred medium for rerooting is LECA. I find that it is not only the fastest method but also a higher survivability rate. Click here to read about LECA propagation. Additional Resources: Click here to watch Amanda Law's video all about root rot When you first get a cutting or small plant you might not need a trellis right away. However, especially if you decide to have epiphytic plants like Hoya you will need to trellis. Hoya's in particular shoot out long tendrils that need to latch onto a surface before it will put out leaves. When looking for trellises there are different factors to consider such as money, material, and height. Depending on the kind of trellis you want prices can range from a couple dollars to twenty or more. I like the 3D printed trellises for small plants but find that they can be a little expensive if you need multiple. Ideally, you might want to consider getting a trellis that does not rot like metal or plastic. However, if money is limited something cheaper like bamboo can be a great option. For me, the best option for my 75+ Hoya collection is a mix between bamboo skewers and bamboo U hoops. When my plants are fairly small, I will start them with a bamboo skewer and cut it down to length as needed for the tendril. As my Hoya's get bigger and shoot off more tendrils, I will switch them over to the U hoops. I find that I can only fit the 16in hoops on the top shelf of my greenhouse which limits how tall my hoops can be. Note: the bamboo skewers can mold over time if in a humid environment.
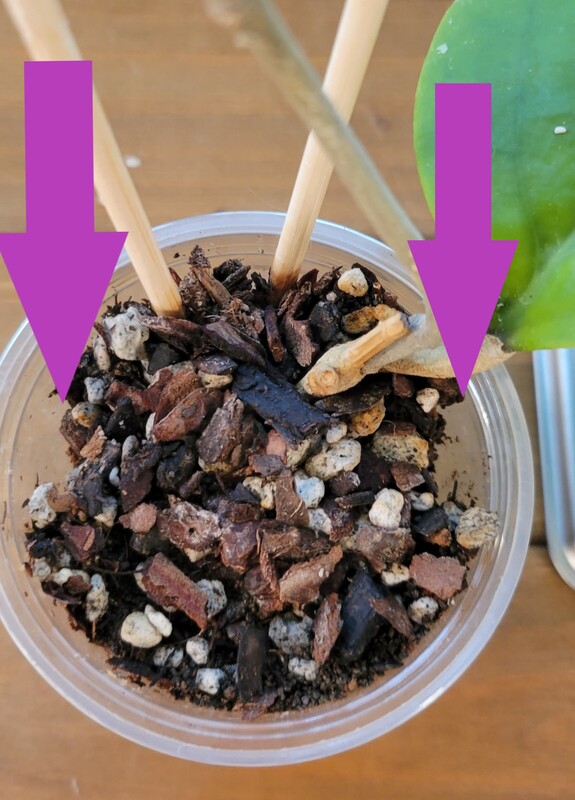
Before I place a trellis into a nursery pot, I will create divots on opposite sides of the pot using a stainless steel chop stick. This makes inserting the trellis into the pot a lot easier.
I left the top part of the tendril loose when adhering it with velcro to the bamboo hoop because if I had secured it facing down the last node to tip of the tendril would have died back. Plants like to grow toward the light. Once the tendril grows a little longer I will loop it back up.
This Australis ssp. oramicola was on my largest 3D printed trellis with an additional bamboo skewer for support before I changed up the trellis to a U hoop.
Before I moved my EPC 1015 to a bamboo U hoop I had it on a bamboo skewer trellis I made with a glue gun and chopped up skewers. If you want more information about using trellises I would recommended watching Unsolicited Plant Talks YouTube video on it. Click here to access.
|
Archives
March 2024
Categories
All
|


 RSS Feed
