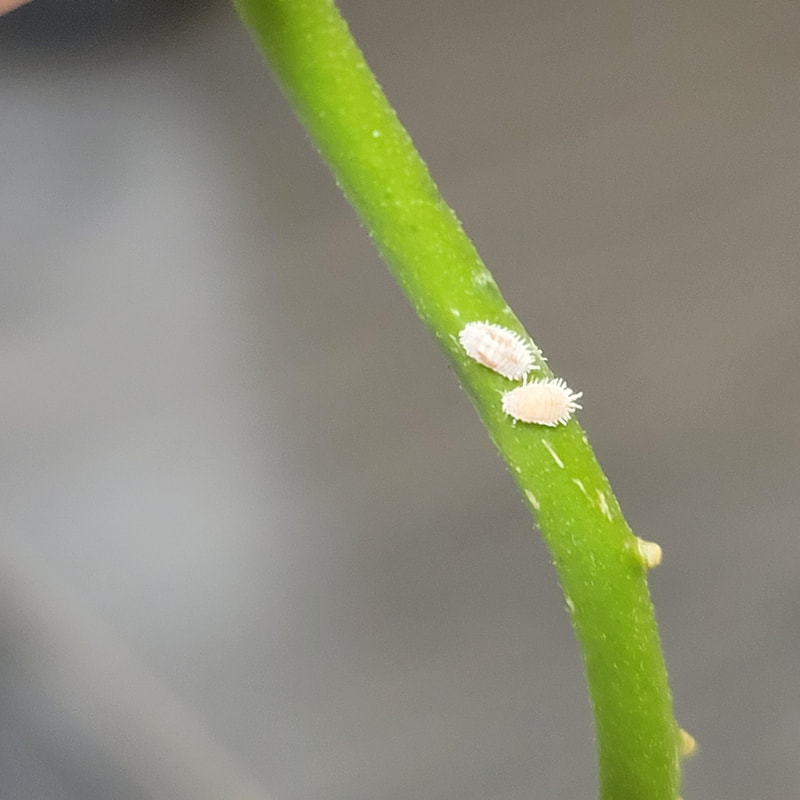
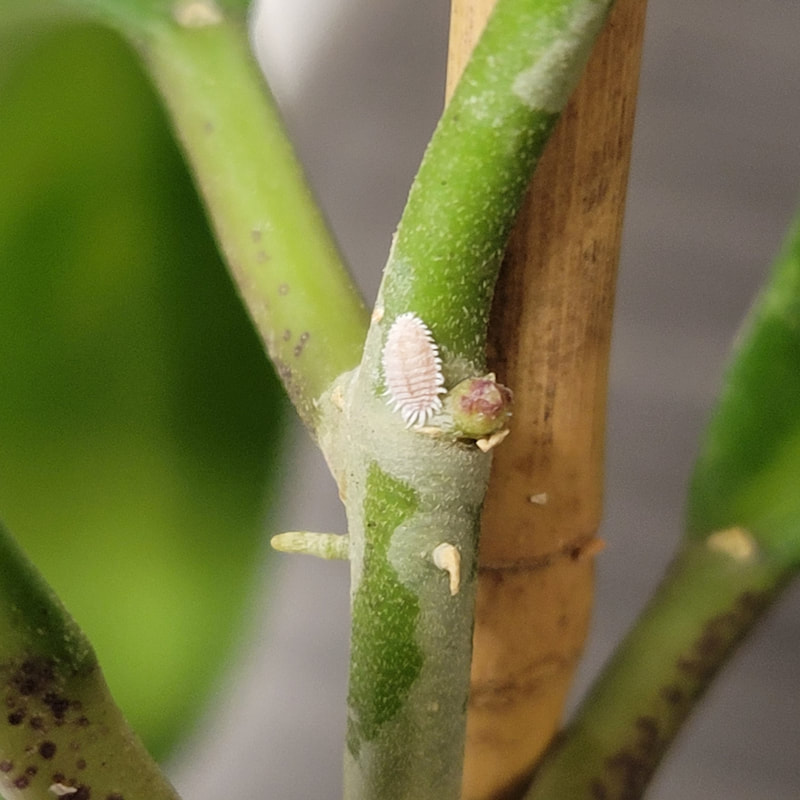
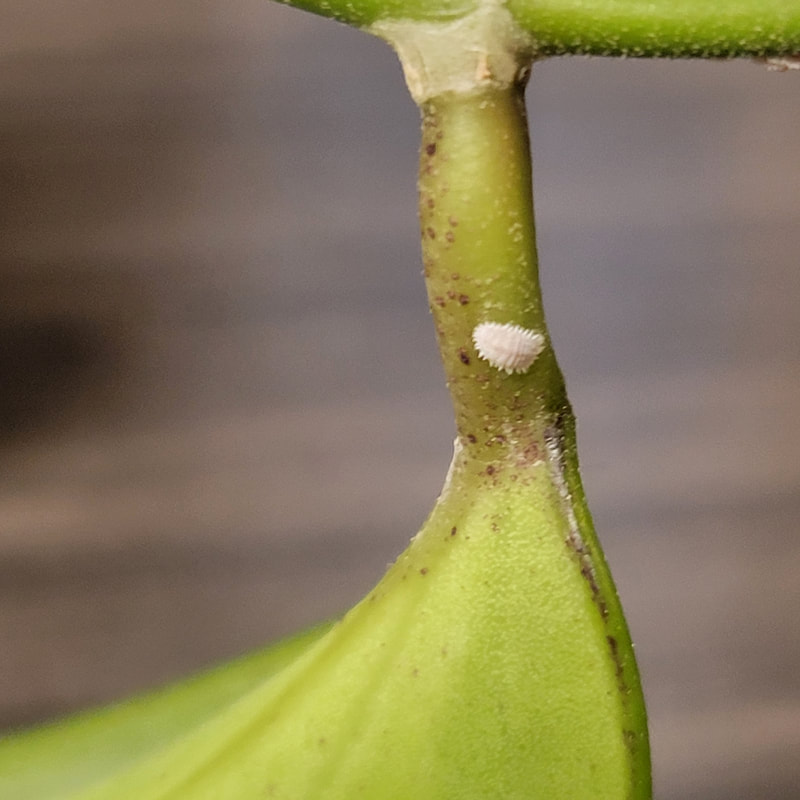
 The Citrus Guy (2019). Different types of female and male mealybugs . Not Mealy Mouthed about Mealy Bugs. https://thecitrusguy.blogspot.com/2019/07/not-mealy-mouthed-about-mealy-bugs.html. Mealybugs are a type of scale insect that have a wax coating. Females are wingless and have a soft oval body. Male mealybugs are smaller with wings and a tail. The average life cycle of a mealybug is 6-8 weeks. These bugs live in warm environments and feed on plant sap. Once they feed, they leave behind honeydew which is their excrement. The longer a plant is exposed to mealybugs the more likely plant growth will slow and leaves may drop. NOTE: Some Hoyas produce nectar. It can be difficult to tell honeydew/nectar apart. Inspect plant closely for pests.  Papacek, D. (2015). Long tailed mealybug in grapevine. Mealybugs. Bugs for Bugs. https://bugsforbugs.com.au/whats-your-pest/mealybugs/. Mealybugs can be easily identified due to their cotton-like appearance. However, these bugs are great at getting in the nooks and crannies of a plant. Make sure to check between nodes, near stems, and under any supports (e.g. clips, velcro) you have if the plant is trellised. Always quarantine any pest ridden houseplants.
If you notice a few mealybugs on your houseplant, you can spot treat with 70% isopropyl alcohol. Take a cotton swab and dip it into the alcohol. Apply the end of the swab directly on the mealybugs. If you notice a large infestation of mealybugs you will want to use a diluted alcohol solution to spray the plant.
Alcohol spray: 1/2 cup isopropyl alcohol 70% 4 cups water If you don't have isopropyl alcohol, you can also use neem oil to kill any life cycle stage of a mealybug. Neem oil comes in concentrate or premade solution. For neem oil concentrate follow the direction on the bottle. If you plan on using neem oil make sure to apply it in the evening to avoid foliage burning. *Note if you use concentrate make sure you use warm water and some type of castile or dish soap to act as an emulsifier with the neem oil. Concentrate: 2 cups warm water 3/4 tsp neem oil concentrate 2-3 drops of free & clear dish soap or castile soap Apply preferred pest control method once a week for 2 months to ensure elimination of mealybugs. Click here to read about root mealybugs.
0 Comments
Have you ever looked at a plant and thought the leaves were looking a little sad or maybe the plant just stopped growing? Yeah...well so have I. You might think all is going great with a plant and suddenly you realize that it has lost the will to live because you probably overwatered it or did something to offend it. Depending on the types of plants you keep root rot can be a major issue. About a month and a half ago, I got a Hoya chelsea which I didn't pot up in my normal soil mixture. Instead, I left some of the original bark it came in and mixed it into my usual soil. Well let me tell you that was a mistake on my part. I didn't realize something was wrong until I started to see the beginning of yellowing leaves. Needless to say, I created a lot of work for myself. In essence, root rot is when the roots of a plant start to decay. Root rot is a fungus and typically happens from having a growing medium that is too moist for a plant or from overwatering. Signs can include stunted growth, yellowing leaves, and brown roots instead of white firm ones. Clear pots are great because you can easily see the roots without having to unpot the plant first. Click here to read more about them. Once you have identified that you do indeed have root rot unpot the plant if you haven't already done so. Next, you need to inspect the roots to see which ones are still viable if any. An easy way to tell if a root is still healthy besides color is by tugging at it gently. If the outer part of the root comes off easily and looks like little white thin hairs then it's a goner.  u/a_cup_of_jojo. (2022). Root rot on H. carnosa 'Krimson Queen'. Retrieved February 13, 2022, from https://www.reddit.com/r/hoyas/comments/i762ad/help_is_this_root_rot_idk_what_to_do_ive_only_had/. Use a pair of sterilized shears to cut off all dead/rotted roots. If none of the roots are salvageable you will need to re-root the plant. Before you either repot it or re-root it makes sure you spray down the plant with a peroxide spray to kill any fungus. Peroxide spray: 2/3 cup water 1/3 cup hydrogen peroxide 3% Combine ingredients into a spray bottle and shake well before spraying over roots. If you have a large plant with root rot and decide to re-root consider cutting it up into smaller pieces which will put less stress on the plant and root faster. I would also consider using fresh soil to pot the plant so you do not recontaminate it after doing all that work. My preferred medium for rerooting is LECA. I find that it is not only the fastest method but also a higher survivability rate. Click here to read about LECA propagation. Additional Resources: Click here to watch Amanda Law's video all about root rot When I first started propagation I was exclusively using sphagnum moss. Moss is a great medium to root especially for beginners. My friend Christie was the one who told me I needed to try LECA for rooting Hoyas. I don't use moss propagation anymore but would definitely recommend using it if you don't want to venture into LECA. Click here to read about LECA propagation.  For a basic moss propagation set up you will need the following:
One important lesson I learned from moss propagation, was that not all moss is created equal. When I first started my plant collection and wanted to try propagating, I made two critical mistakes: 1) I used cheap sphagnum moss that was atrocious to root in 2) I had no ventilation which caused mold/rot After that, I stopped trying to propagate because I didn't think I was capable of doing it successfully. Flash forward a couple months and I decided to try again. This time I watched a lot of videos, read articles, and got some pointers from my plant community. Once you have the right set up, propagating in moss is easy. Directions: First, put a layer about 1.5 inches thick of moss in your clear container. To wet the moss, you will use Liqui-Dirt. Make sure you follow the directions on the package because it requires two dilutions. The moss should be damp but not saturated. If you squeeze the moss in your hand, you can see how saturated it is. Next, place all your cuttings so that the bottom is partially buried in the moss. Put the lid back on the container to seal it and place it on a heat mat under grow lights. Heat mats can be on 24/7. I would recommend using grow lights for 12 hours a day. If you choose to not put any ventilation holes in your propagation box like me then I would recommend opening it up once a day to prevent mold/rot. Depending on what types of plants you are trying to root you might see root development in 2-4 weeks. Additional resources: Click here for Harli G's prop box video When you first get a cutting or small plant you might not need a trellis right away. However, especially if you decide to have epiphytic plants like Hoya you will need to trellis. Hoya's in particular shoot out long tendrils that need to latch onto a surface before it will put out leaves. When looking for trellises there are different factors to consider such as money, material, and height. Depending on the kind of trellis you want prices can range from a couple dollars to twenty or more. I like the 3D printed trellises for small plants but find that they can be a little expensive if you need multiple. Ideally, you might want to consider getting a trellis that does not rot like metal or plastic. However, if money is limited something cheaper like bamboo can be a great option. For me, the best option for my 75+ Hoya collection is a mix between bamboo skewers and bamboo U hoops. When my plants are fairly small, I will start them with a bamboo skewer and cut it down to length as needed for the tendril. As my Hoya's get bigger and shoot off more tendrils, I will switch them over to the U hoops. I find that I can only fit the 16in hoops on the top shelf of my greenhouse which limits how tall my hoops can be. Note: the bamboo skewers can mold over time if in a humid environment.
Before I place a trellis into a nursery pot, I will create divots on opposite sides of the pot using a stainless steel chop stick. This makes inserting the trellis into the pot a lot easier.
I left the top part of the tendril loose when adhering it with velcro to the bamboo hoop because if I had secured it facing down the last node to tip of the tendril would have died back. Plants like to grow toward the light. Once the tendril grows a little longer I will loop it back up.
This Australis ssp. oramicola was on my largest 3D printed trellis with an additional bamboo skewer for support before I changed up the trellis to a U hoop.
Before I moved my EPC 1015 to a bamboo U hoop I had it on a bamboo skewer trellis I made with a glue gun and chopped up skewers. If you want more information about using trellises I would recommended watching Unsolicited Plant Talks YouTube video on it. Click here to access.
If you are looking for some good plant content on YouTube I have a couple recommendations for you to check out. Amanda has really good educational content as well as lots of Hoya related videos.
Rachel the plant madam is a bit of a begonia queen. She has a lot of unboxings and plant care videos on her channel. I really enjoy the after dark podcast with her husband. I don't know about you but when I first became a plant parent, I was so concerned with what plant I was going to buy but did not think about lighting. Having proper lighting is paramount to being successful as a plant parent. Too much or too little light can severely impact the health of your plants. Before you decide to buy another plant make sure you consider the specific needs of the plant. It can be hard to understand the different types of light a plant might need. The chart below helps to illustrate types of indoor light and what that looks like in your space.  Heinz, A. (2020). Types of Indoor Light. 33 Low-Light Houseplants to Bring Your Space to Life. Apartment Guide. https://www.apartmentguide.com/blog/low-light-houseplants/. If your lighting situation sucks and is not ideal for your plants do not fret! I went from a beautifully lit apartment with southeast facing windows to north facing. This is where grow lights can be an immense help. I personally use Barrina T8 grow lights and I love them. My lights run for 12 hours a day and run on an automatic timer. If you choose to use natural light only remember that light intensity will vary based on which way your windows face as well as what time of year it is. You can easily figure out what way your windows face by downloading a compass app on your phone. Additional Resources: Click here to access an article by The New York Botanical Garden on lighting. Recently, I completely stopped using a propagation box with sphagnum moss and switched all of my cuttings to LECA (lightweight expanded clay aggregate). I noticed that some of my moss propagations were taking such a long time to root especially the woody stemmed Hoyas. I root in LECA and then put the cuttings in soil. You just need a few basic supplies to utilize LECA. Supplies:
First, you will want to put your net pot into the cache pot. Next, I put a few LECA pebbles at the bottom. Then, I will add in my cutting and fill the net pot up with more LECA pebbles. Once your cutting in secured fill up your cache pot with Liqui-Dirt roughly a third of the way high. Lastly, stick your propagation on a heat mat that is under a grow light. Your cutting should grow decent roots in 1-2 weeks. I notice that I do have to replenish the water reservoir every 1-2 days to keep the water at a high enough level for the LECA pebbles to absorb. When you notice roots coming out of the net pot into the water reservoir that is a good sign that it's time to remove the cutting from LECA and pot it up. I first remove the net pot from the cache pot. Next, very delicately remove the cutting from the net pot making sure to not pull off any roots. If any roots are stuck on the LECA pebbles I try to gently remove them if possible. The used LECA I set aside till I get a big enough pile and then I will sterilize it. You can sterilize LECA by boiling it on the stove for 10 minutes in water. Then, use your desired potting medium to pot up the cuttings. I pot mine in soil with systemics. Lastly, water your new plant and ideally keep on heat mat for a while longer to keep developing the root system. After I am done with the cache and net pot, I use Physan 20 to disinfect the pots and leave them to dry to be reused. If you find yourself in the mood for a little retail therapy here are some of my favorite shops:
PlantTheStudio - Weekly restock on Saturdays 9PM eastern time (New York) Homestead Plants - Restocks are sporadic, follow her FB page for updates (Pennsylvania) The Green Plant - Restock dates listed on website pacific time (Arizona) Synthesis - Usually has a decent stock of basic Hoya at reasonable prices (Pennsylvania) Plants Wake You Up - Great option for cheaper unrooted cuttings (California) Unsolicited Plant Talks - Restocks are sporadic, stocks some harder to find Hoya's (California) Happy hunting! I water my Hoya's once a week. This gives them time to dry out before their next watering because the grow medium doesn't hold a lot of moisture. Click here to check out the soil mix I use. Besides filtered water, I use Neptune's Harvest Fish & Seaweed Fertilizer 2-3-1 as well as Liqui-Dirt as recommended by my friend and mentor Christie. My watering schedule is as follows: Week 1 - Neptune's (diluted to half strength) Week 2 - Liqui-Dirt (follow directions on package *two-step dilution*) Week 3 - Plain filtered water I find that even in the winter time using this schedule I have great success with plant growth. Additionally, I mix in 2-3 drops of ecological labs microbe lift mosquito control per gallon of water to keep fungus gnats away.
Keep in mind that how often you water your Hoyas is highly dependent on your environment as well as your chosen grow medium. Click here to read about my fertilizer update Sep 2021. Click here to read about my fertilizer update May 2022. Within the plant community, I would say there is some disagreement when it comes to leaf shine. Some argue leaf shine is harmful to plants and can damage leaves with harsh chemicals while others say it helps clean foliage and repels dust. I fall somewhere in between. I do think it is important to keep your foliage clean so your plant can get adequate sunlight and photosynthesize. Some products/methods for leaf shine I am not a huge proponent of e.g. Miracle-Gro leaf shine or mayonnaise. However, I recently came across a blog post from April Mall (Unsolicited Plant Talks). In her post she has a simple recipe that I love. April's Recipe:
When I make up this recipe, I reduce the amount of peppermint oil to 10 drops. Once you have your solution, April recommends a microfiber cloth for the application. Spray the leaf shine on the cloth and clean away! IMPORTANT NOTE: avoid using on any pubescent foliage Click here to check out April's original post.
|
Archives
March 2024
Categories
All
|


 RSS Feed
